Table of Contents
- Introduction - Understanding the basics
- A Recent Example
- Mining Character Build
- An Explanation on Mining Fundamentals
- The Atlas
- Planets and Elevation
- Preparing to Mine
- Basic Mining Technique
- Alternative Mining Techniques
- Taking it to the Next Level
- Dealing with Lava and Other Impediments
- Tips and Tricks
Introduction- Understanding the Basics
@Vansten’s Forging Guide was a huge help to me so I thought I’d share a similar guide in an area that I’d like to think I’m fairly experienced with: mining.
Mining itself is very simple. You swing a hammer. You plow through rocks. You find the shinies. However, there are many things you can do to dramatically improve:
- Your yield per hammer
- The speed at which you get through a hammer
- The cost associated with mining
This guide is my humble entry to towards that end and it’s my sincere hope you find it useful.
A Recent Example
Click to Expand
First, I’d like to start from an example:
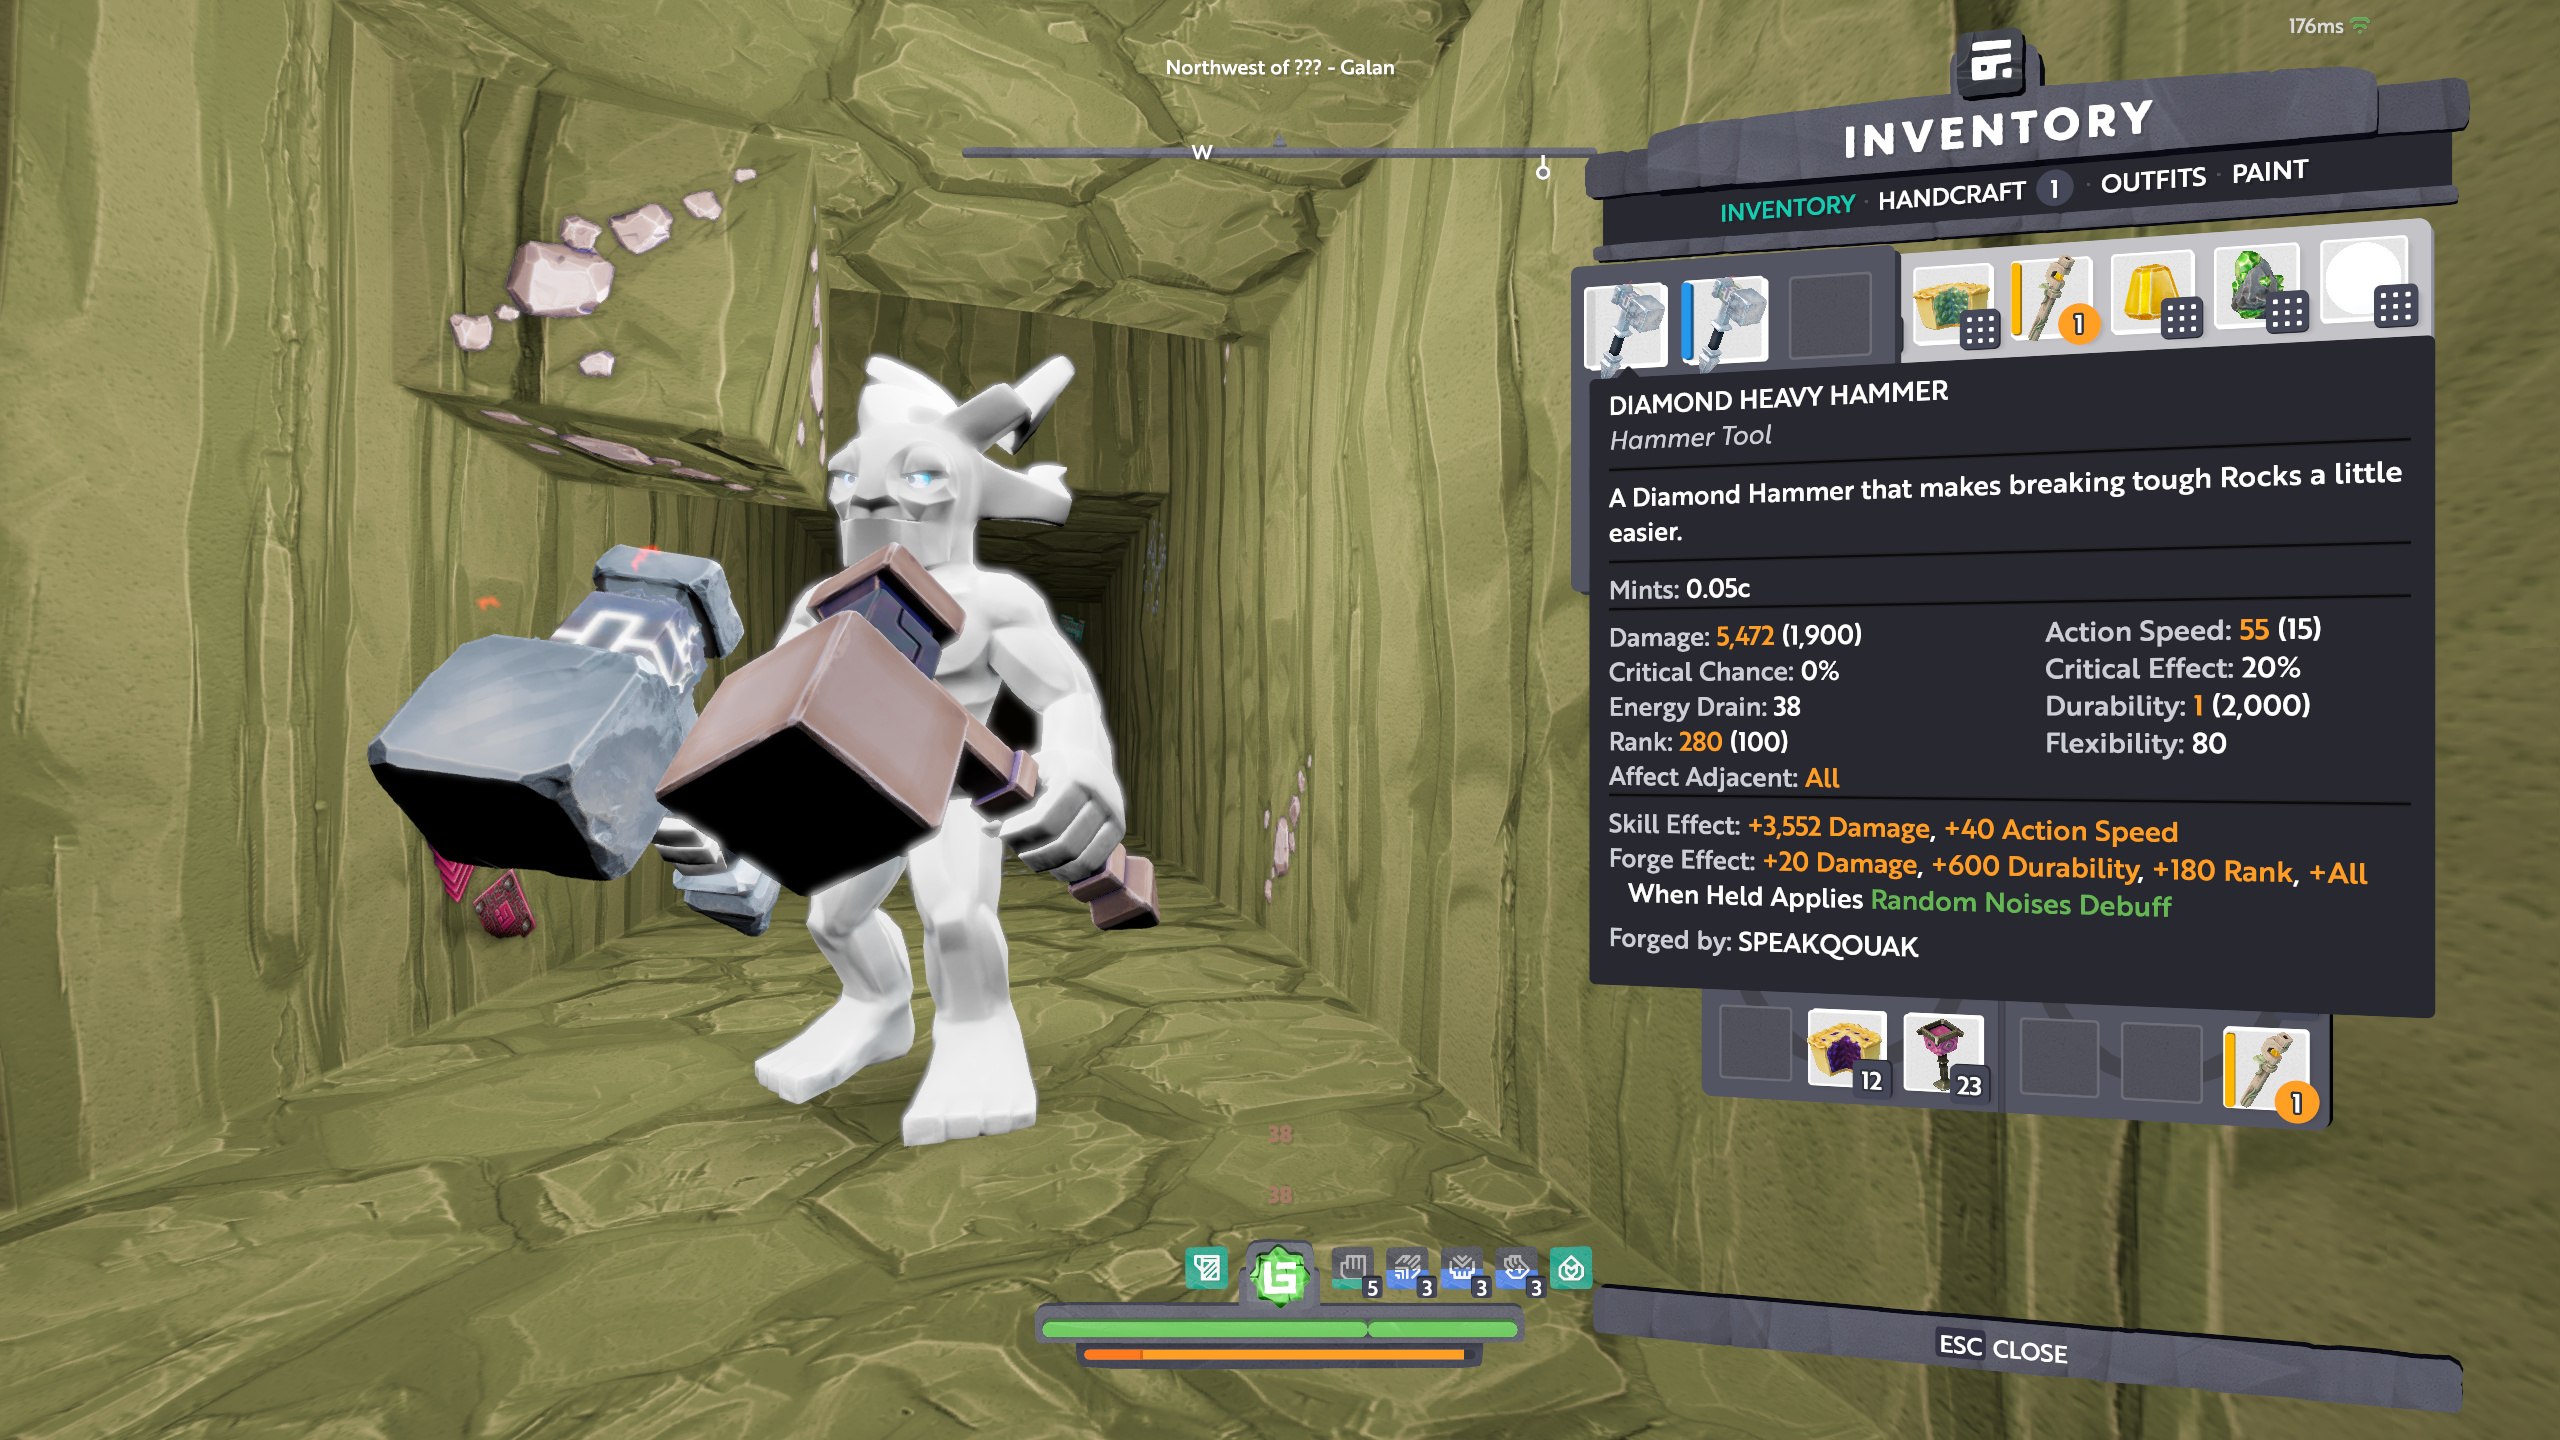
This is the hammer I just used on Galan to mine Topaz
I’m showing it at 1 durability. Notice it started at 2600 durability but, aside from the extra 600 durability, is a standard T6 AoE one-shot hammer
This was my yield from this one hammer
The three stacks of topaz at the end of the second inventory row are all smart stacks. The fourth stack of topaz to start the third inventory row has 102 for a total of 2802 topaz off a single hammer.
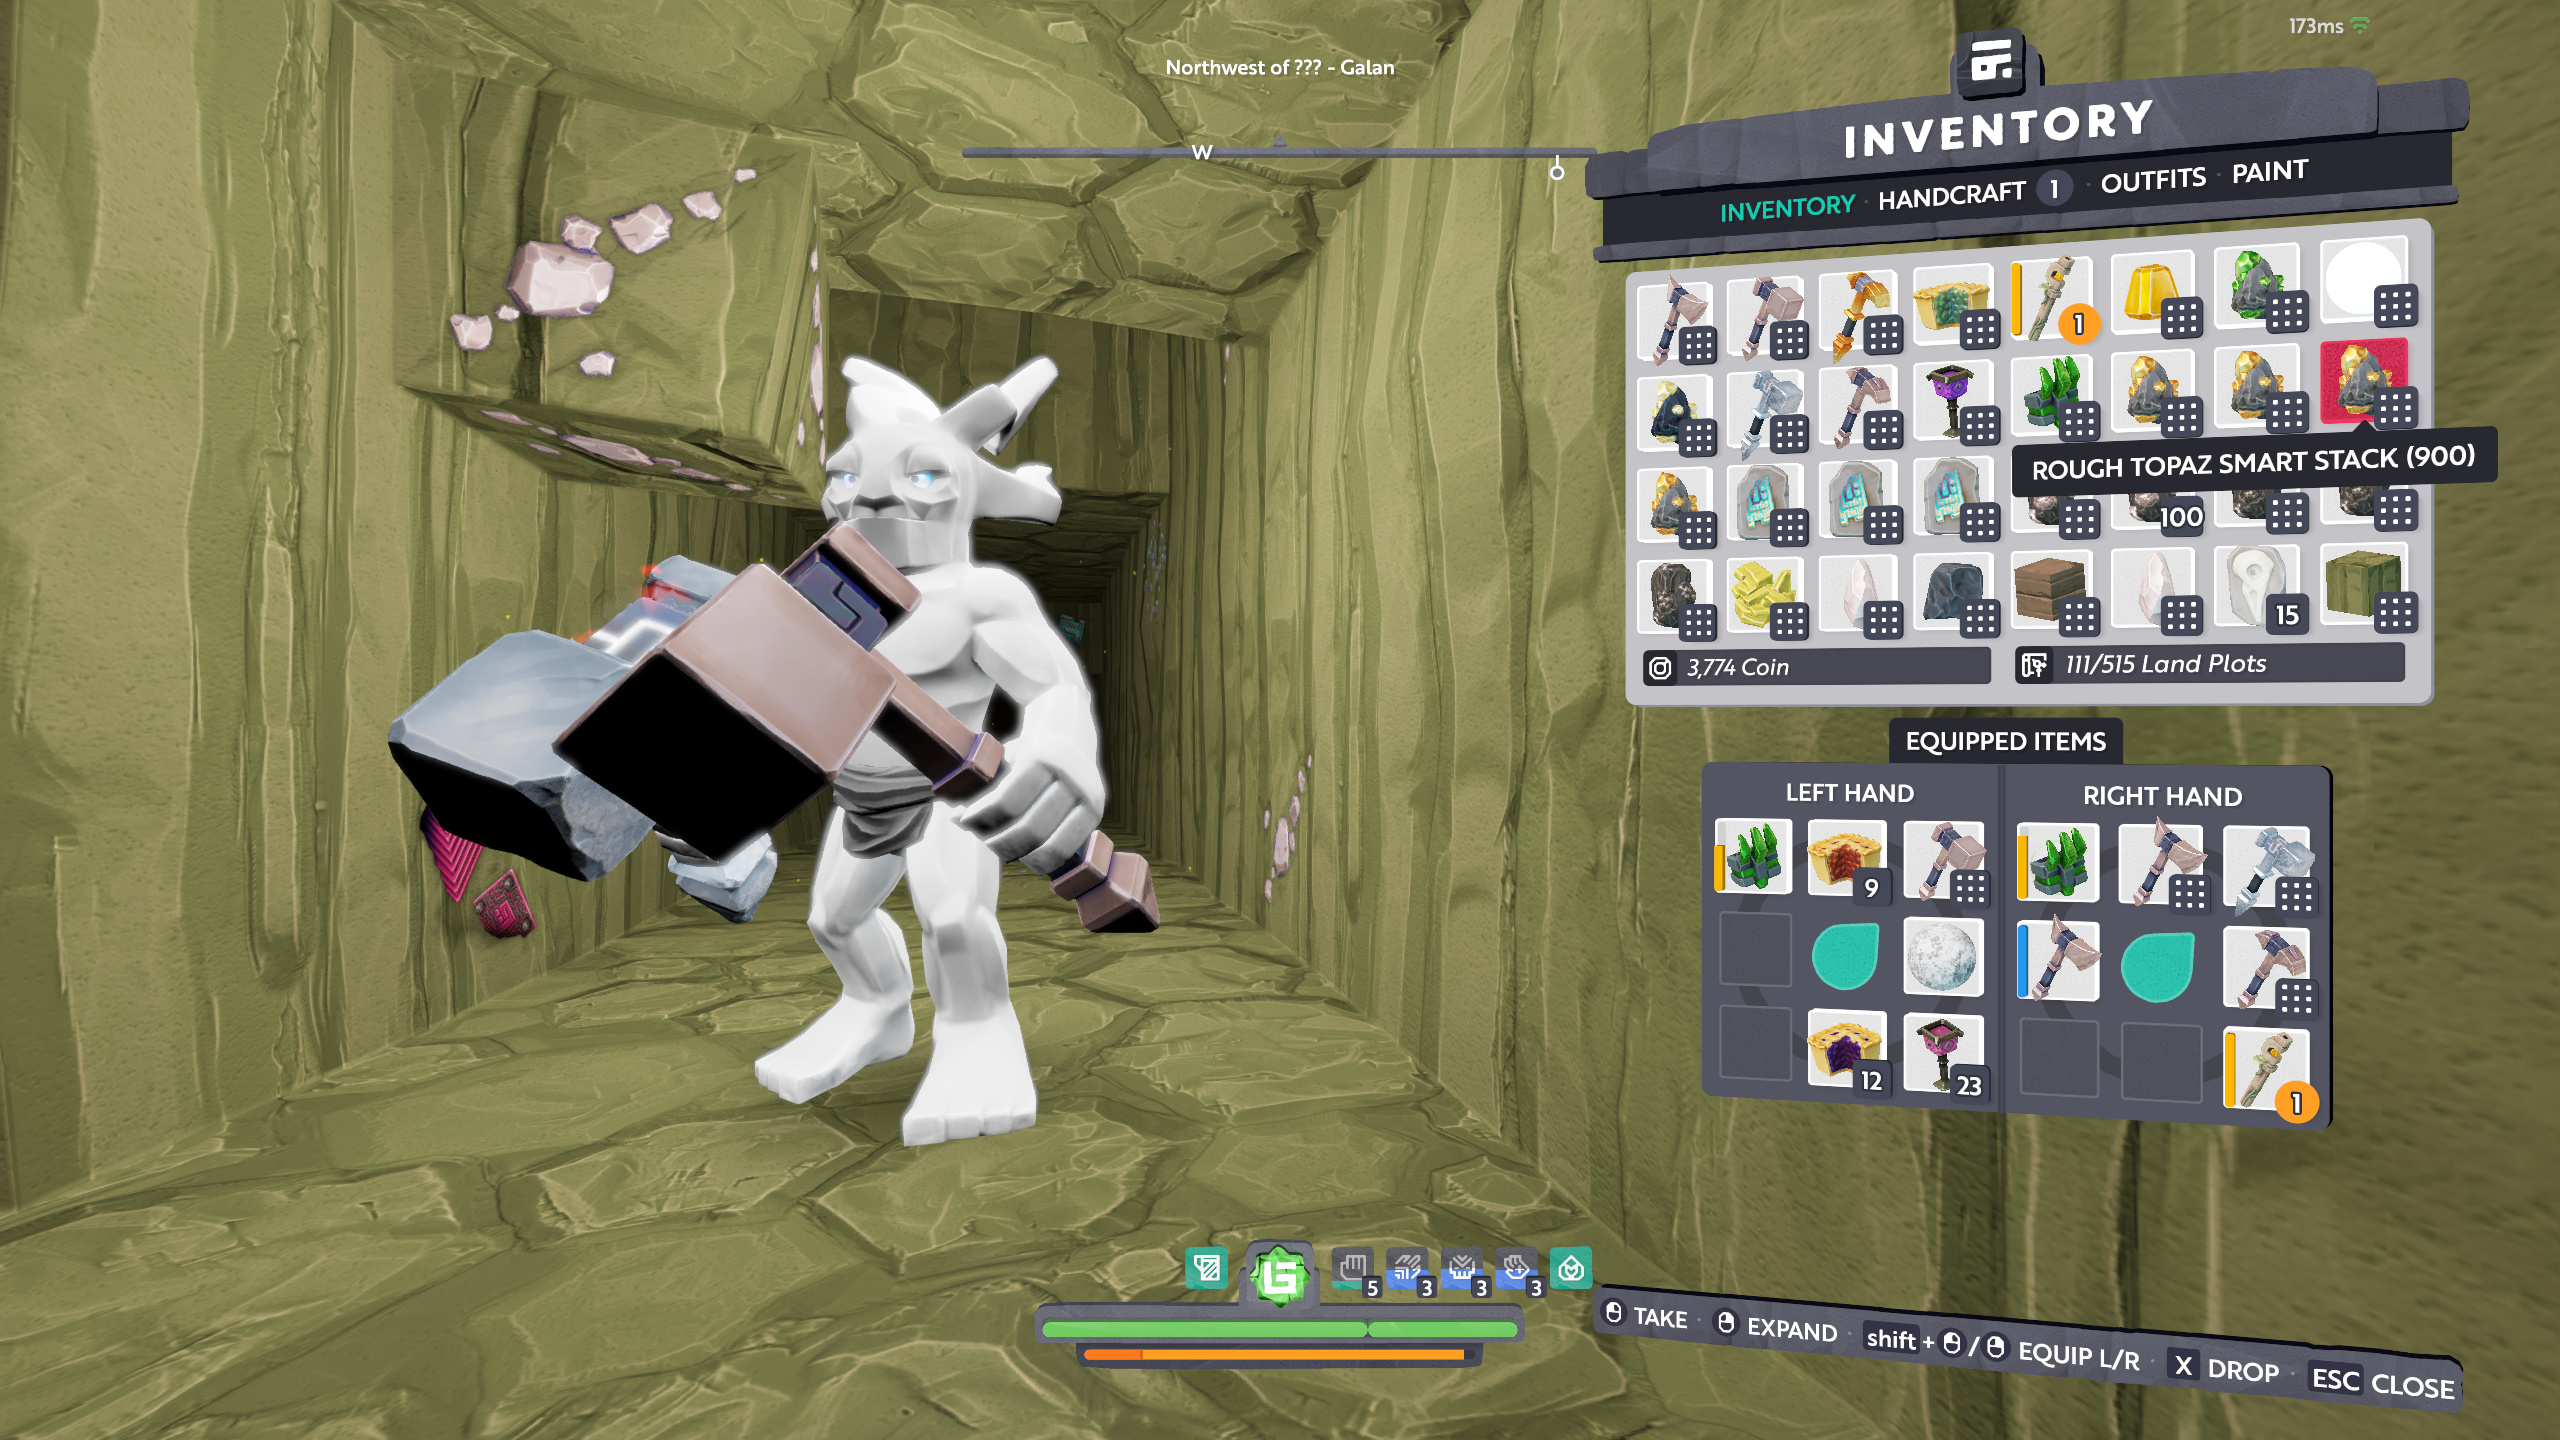
I started from a fresh XP bar and was able to get a little over 2 and a half levels

So, we have the following from one, T6 AoE one-shot with +600 durability:
- 2802 topaz (generally, my yield for topaz is hammer durability + 10%)
- 792 titanium
- 1614 ancient technology (a mix of all three types)
- 2293 iron
- 118 sulphur fragments
- 167 cobalt fragments
- 53 olivine fragments
- 185 opals
- Too much @#^@#^!! rock salt to ever use
- Almost one smart stack of assorted coal
- A little over two and a half levels.
Another recent example is the one I just finished:
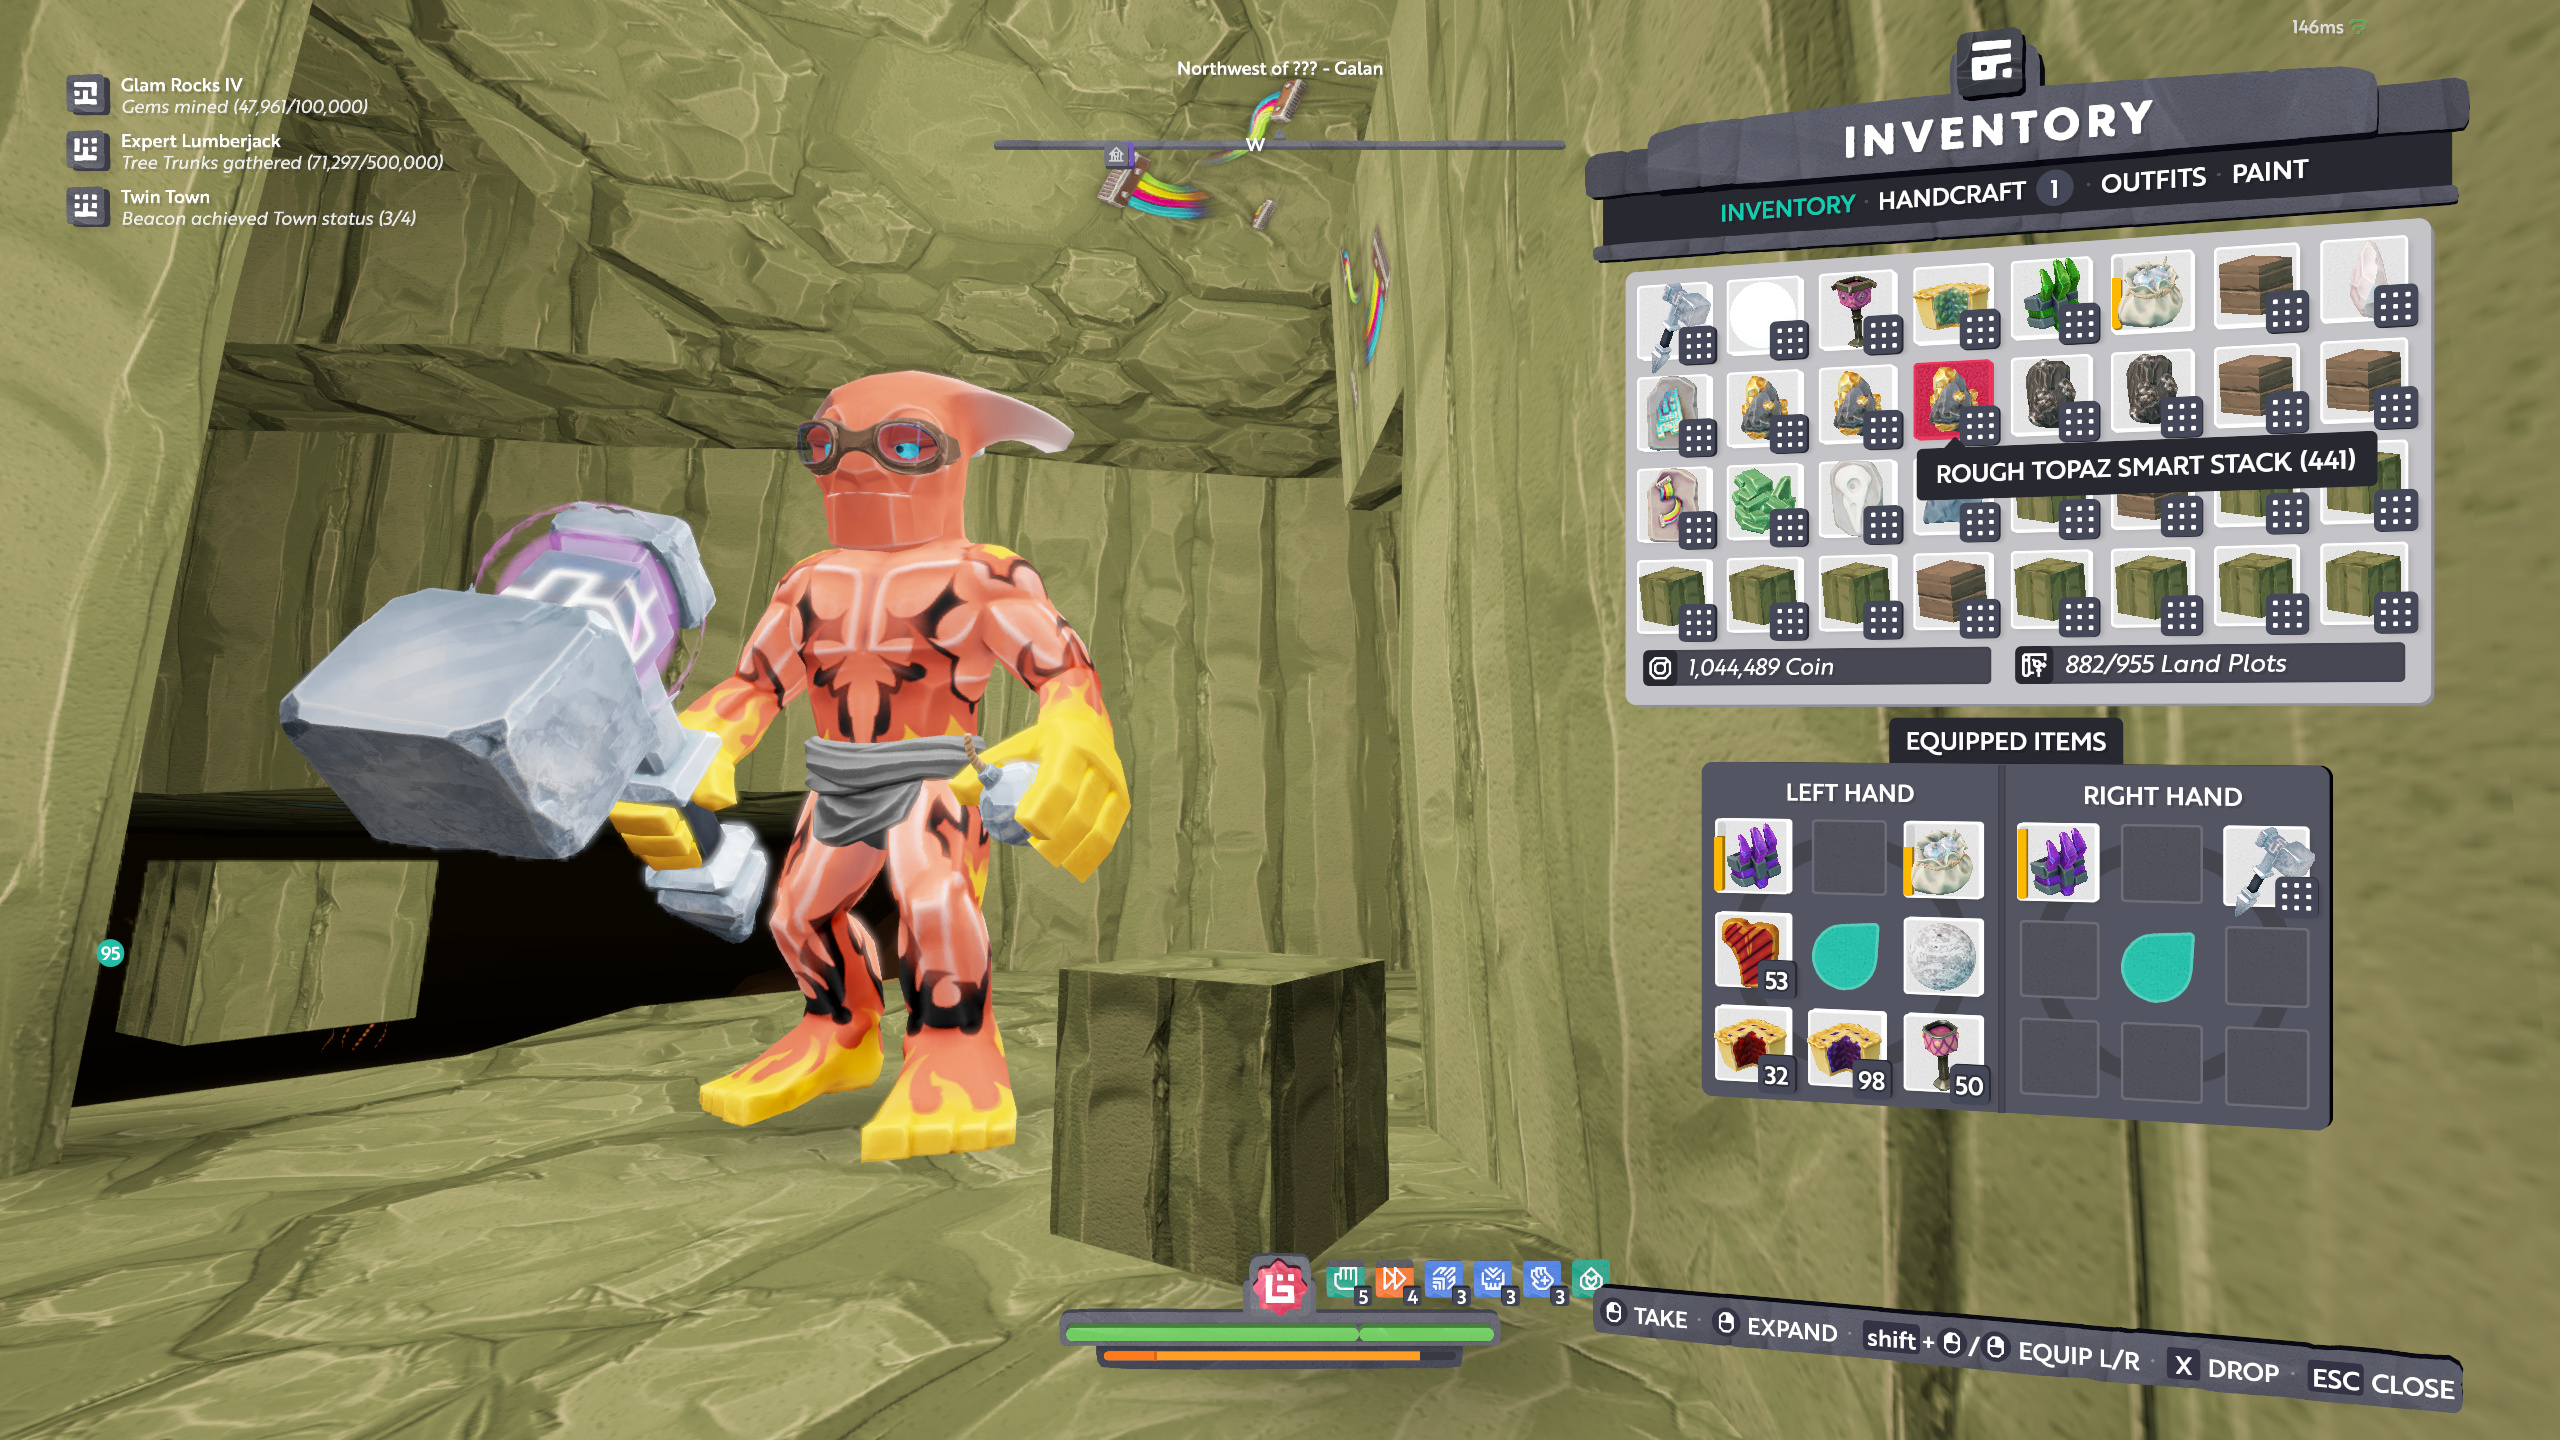
The first two topaz slots are full smart stacks so that puts the yield at 900 + 900 + 441 = 2241. Note that this was using a T6 AoE one-shot with max action speed (no extra durability) so the 2241 yield seems right on target compared to the 2802 I got in the first example via a hammer with +600 durability instead of action speed. 600 is 30% of 2000 so we’d expect 2802 * .7 = 1961 topaz from the second example’s hammer which means I was more efficient than expected!
Before I explain how to get yields similar to the above, you should know that my focus was, in order, topaz > ancient technology > iron. Everything beyond that was just ancillary. I focused a bit more on ancient technology for this particular run because I sold two smart stacks of remnants to a guidie earlier in the day. Typically my second priority is usually titanium, gold or silver.
Now that you’ve seen the kind of results you can get (at least for topaz - more on this later), let’s start talking through how to get there. To begin, we should discuss your build.
Mining Character Build
Click to Expand
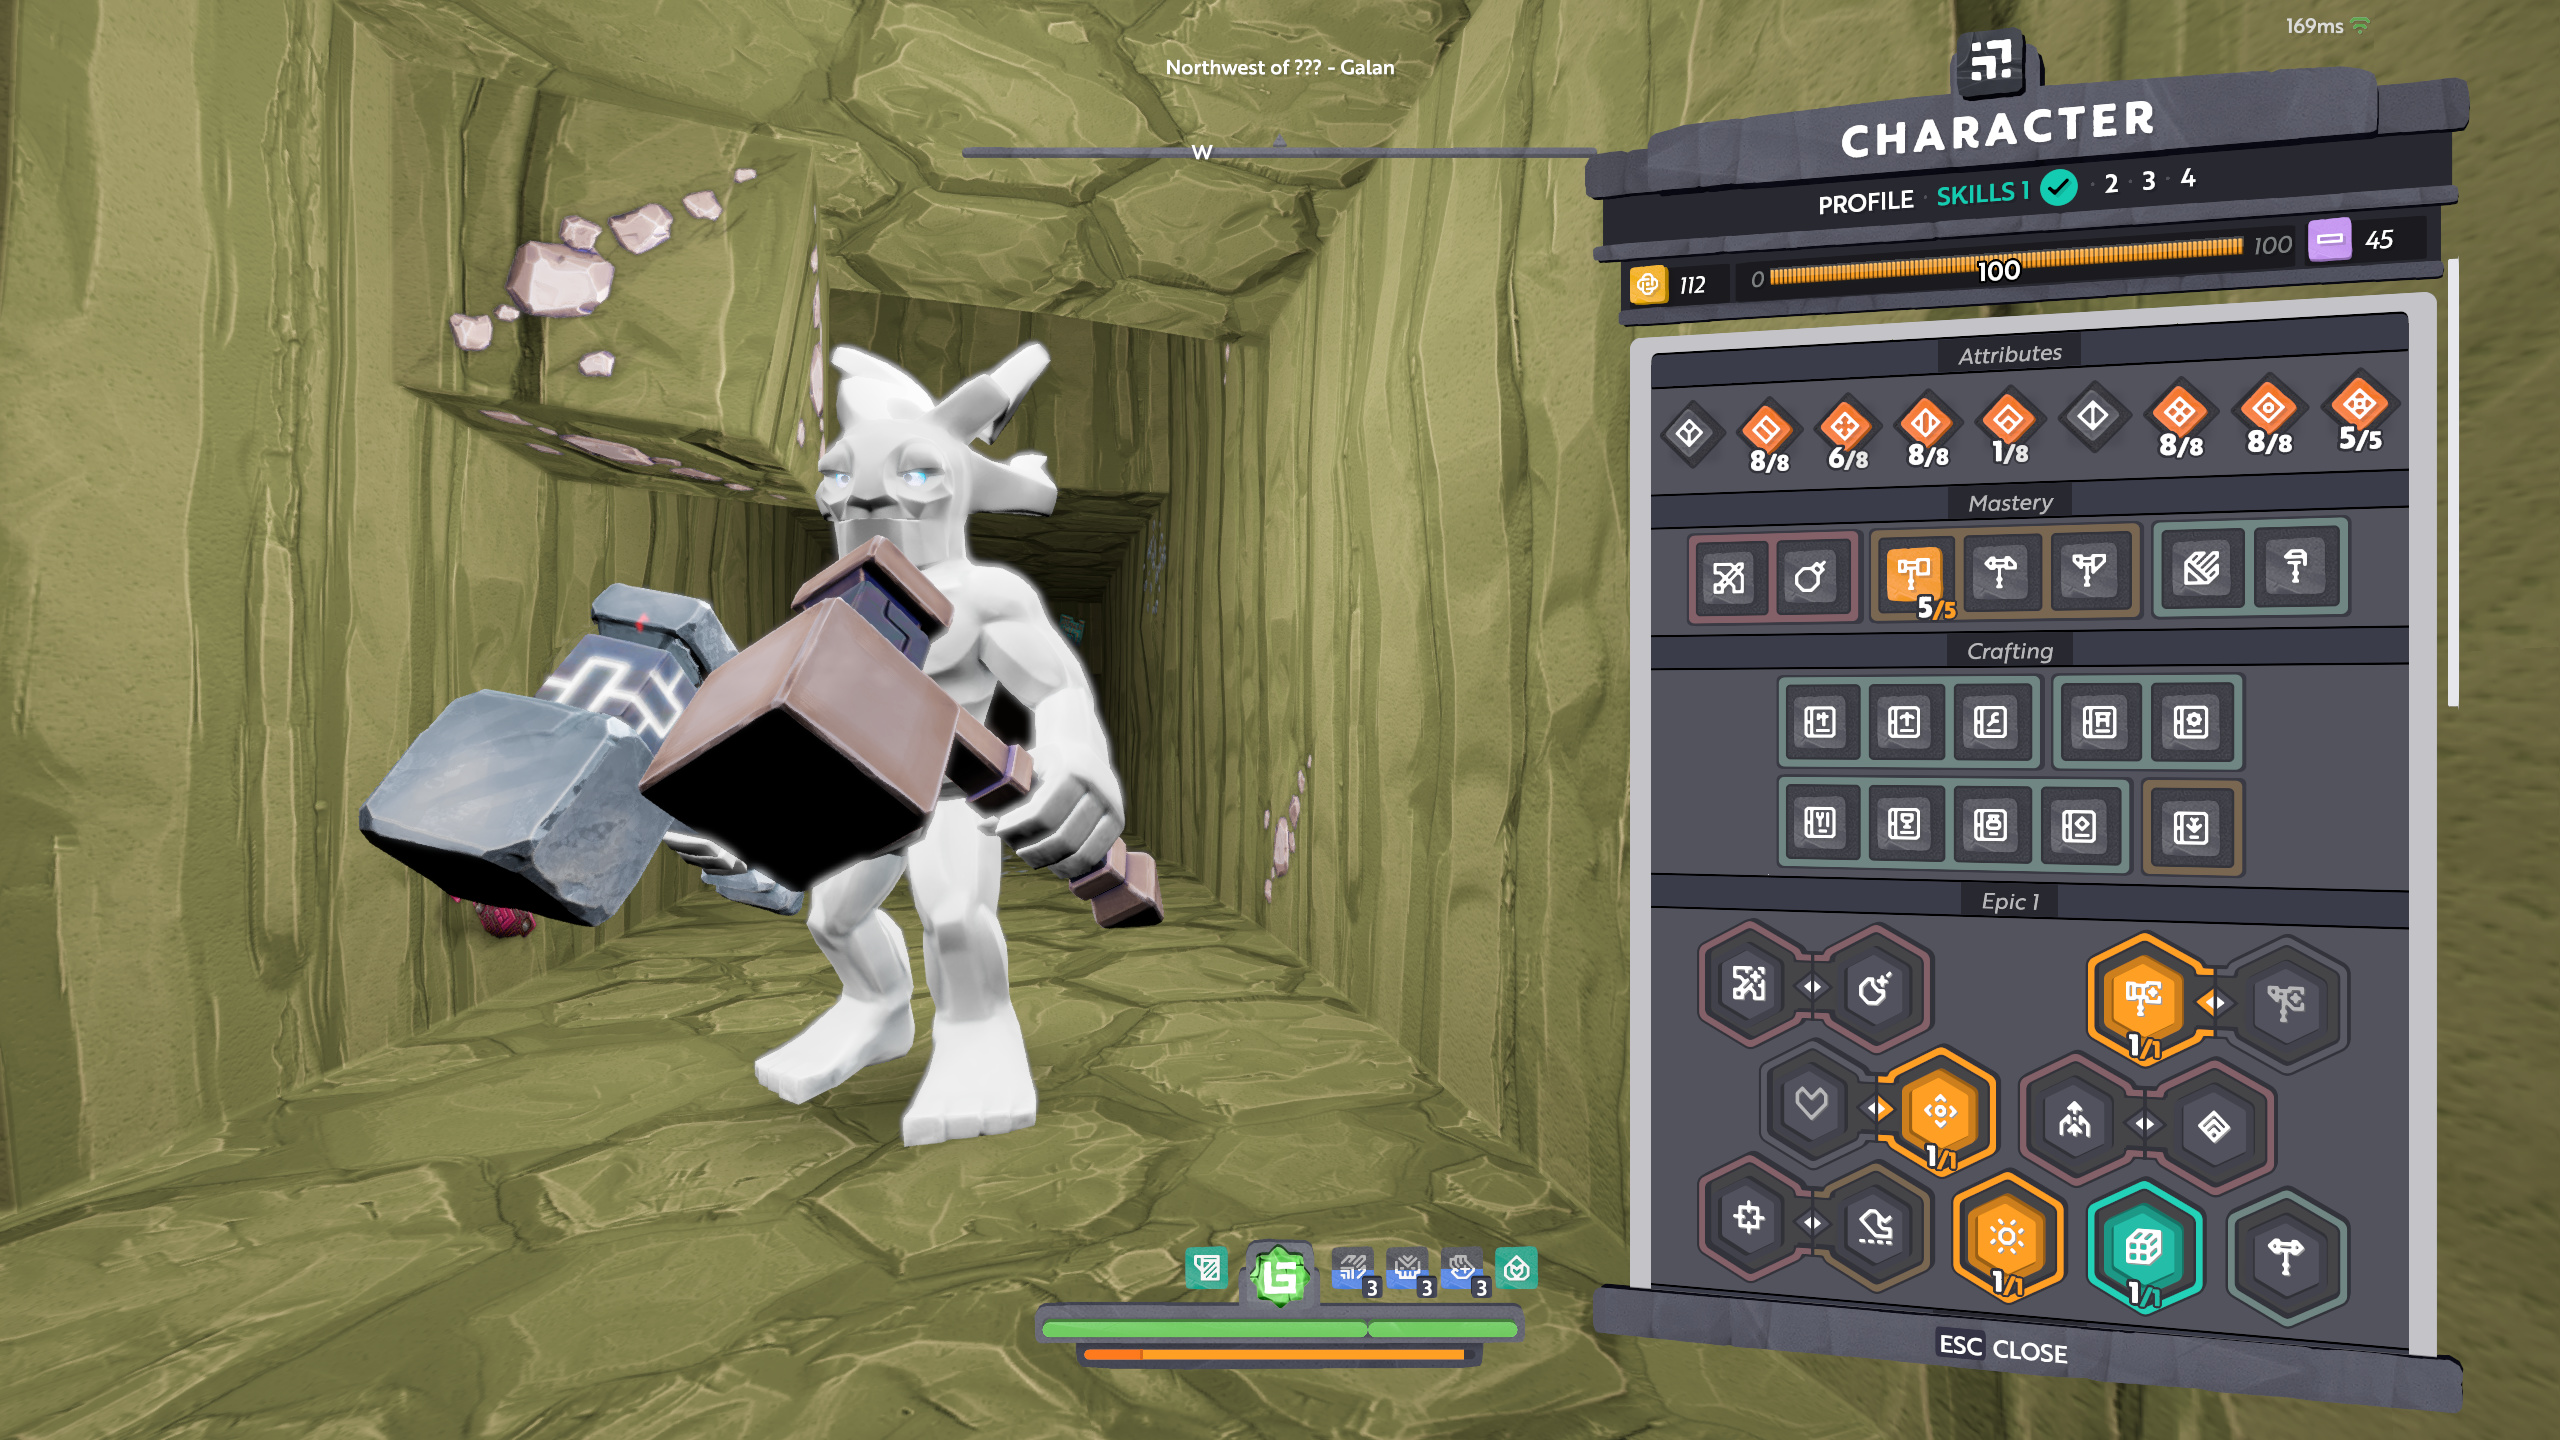
Attributes ==> Epic 1 of my build is as follows:
Endurance ==> Epic 3 is as follows:

The only talent row not shown is the last row of Epic 3 which is all crafting-related and therefore none are taken for mining.
There’s some flexibility in a good mining build but, first, let’s cover what I consider absolutely mandatory pieces:
- 8/8 Power
- 8/8 Dexterity
- 8/8 Luck
- 8/8 Zeal
- 5/5 Attributes
- 5/5 Hammer Mastery
- Hammer Epic
- Energy Epic
- Durability Drain Epic
- Resistances - this will vary by your preference and/or what you’re targeting but let’s assume a minimum of 5/5 in a single resistance so you could theoretically visit a specific T7 exo.
- Damage Epic
Given the above, we have a mandatory point allocation of 67 points. This means you have 33 points remaining that you can use as you see fit. Personally, I use these points as follows:
- 6/8 Control
- 1/8 Agility
- Volume Crafting Epic
- Energy Regeneration Epic
- 4/5 and 4/5 of the other two resistances that are not the one we went 5/5 with above.
- 3/3 Warp Distance
- Light Source epic (so I don’t need to carry torches or have glow forged onto tools as it takes up a boon slot)
The above six are personal preference.
- Control is nice but when strip mining (more on this in a moment), I don’t need it maxed.
- The 1 agility is just for ease of getting to my mining location without spending the 100c to warp from the planet. I could realistically move a couple points from Control to Agility but I think I prefer a little more Control.
- The Volume Crafting Epic is a quality of life upgrade for my miner so that I don’t have to pass off any rocks or coal to my crafter to mass craft them.
- The Energy Regeneration Epic is my preferred method for mining as it gets me back to full energy, from empty, in about 3 seconds. Alternatively, you could use brews or bombs to boost your energy but I honestly find the swapping to another brew or bomb and using just as long (if not longer) than waiting the 3s for my energy to replenish on its own and it saves me $$$.
- Lastly, the warp distance is primarily for exos. You will need warp distance in order to warp to most exos so it’s handy to just have it.
An Explanation of Mining Fundamentals
Even if you’re an experienced miner in other games, mining in Boundless will assuredly provide a new challenge for you. While the basic concepts are the same, Boundless introduces a few nuances that we’ll cover here.
The Atlas
Click to Expand
Atlases are critical when mining as they allow you to see exactly where the resources you want to mine are located. Long in the past, when the atlas was introduced, atlases took up to 24H to update. While they were still useful, this lead to a lot of false positives of the atlas showing density for a resource that, once you arrive, is mostly mined out. Several patches ago, atlases were improved to update almost in real time (I believe the time is 5s but we can just treat it as real-time). For this reason, it’s critical that you only ever mine in an area where there is sufficient density.
The way the atlas works is simple:
- Equip it
- Drop 1 of the resource you want to gather directly onto the atlas
- “Use” the atlas on the planet you’re going to gather from. Using the atlas on a planet syncs it to that planet permanently. The only exception to this is if you sync an atlas to an exo world. Since exos are temporary, once they disappear the atlas is cleared and you can reuse it.
- Atlases will only show regions that have been discovered while the player has the atlas on them and synced to that planet. More on this later.
As for crafting atlases, they are pretty trivial to craft at just glass + copper bars or you can buy them for next to nothing.
Here’s an example of my atlas while mining topaz on Galan:
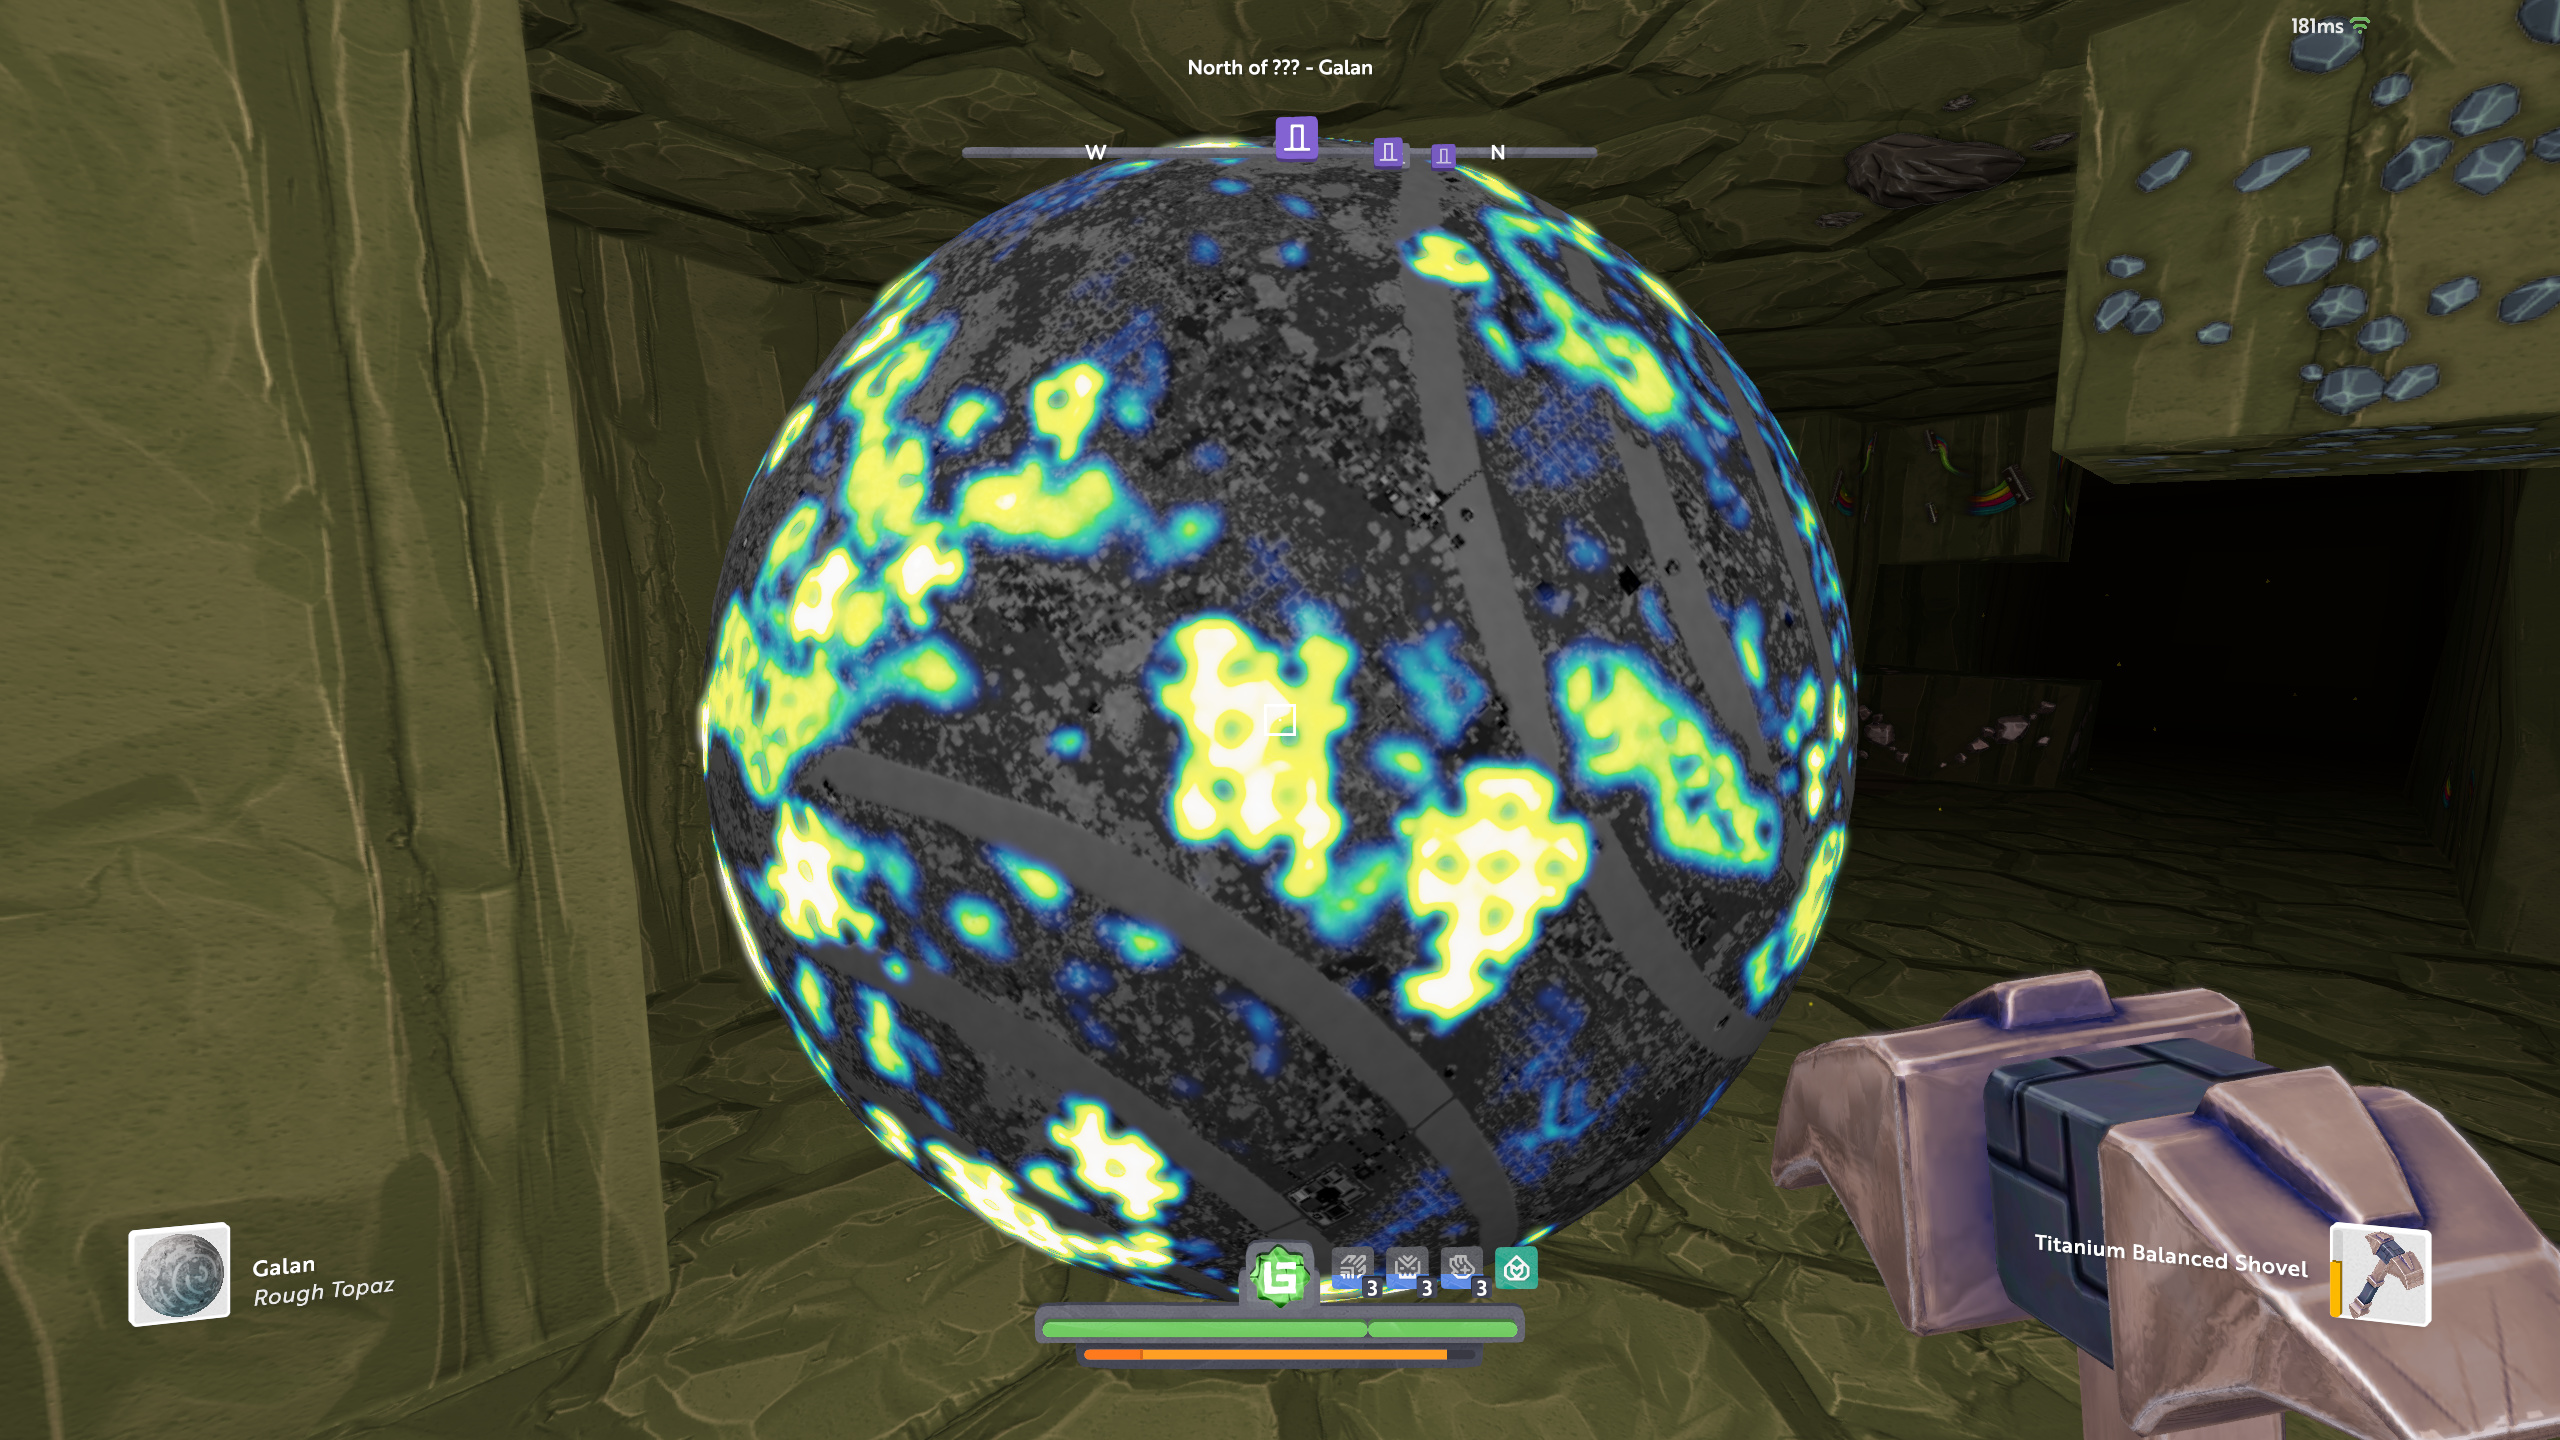
The “brighter” the spot, the more density of the resource you’ll find there. The colors generally go, in order of increasing density, blue < light blue < yellow < white.
Planets and Elevations
Click to Expand
This guide will focus on gem mining and better. As such I won’t be covering the lesser ores of copper ==> titanium. Suffice it to say that, if you are mining for gems or lucent, you will come across plenty of lesser ore depending on what you’re mining. Additionally, note that there are multiple possible planets to mine from for each gem types and even multiple tiers. For this guide, I’m going to point you towards what I prefer for the greatest yield but will briefly cover other options as well.
Ore                              Planet                              Elevation
------------------------------------------------------------------------------
Emerald                      Shedu Tier                          5 - 25
Amethyst                     Norkyna                              5 - 25
Diamond/Ruby                     Malurialikrib                       5 - 20
Topaz                            Galan                               120 - 210
Sapphire                      Houchus I                              90 - 120
Rift                             T7 Rift Exo                         25-55
Blink                            T7 Blink Exo                        5 - 25
Umbris                           T7 Darkmatter Exo                   120 - 160
Please keep in mind that these are recommended elevations and not the actual elevations gems spawn at. For example, topaz spawns all the way up to 220 elevation. Diamonds spawn slightly above 20 as well.
If you are looking to mine the ore itself and sell it, then there are differences in location for the ore pairs. Emerald and Amethyst are both on corrosive/toxic planets but one spawns liberally under water (Emerald) but Amethyst forms strict lines around the perimeter of water at the aforementioned elevation. Diamond spawns liberally deep under mountains on blast planets but is mutually exclusive with ruby for the most part. Basically, if you see ruby (or silver), you are likely not going to see any diamonds and visa versa. For topaz and sapphire, they spawn at slightly different elevation on shock/chill worlds. Sapphire is roughly 80 - 140 and topaz is roughly 110 - 210 but mining at 120 - 160 will net you majority topaz with a little bit of sapphire as a bonus. If you are after purely sapphire rough ore, then go a bit lower and head to Houchus I. You’ll find plenty of it!
If, however, you are looking to take any of these gems beyond rough ore (i.e. compact it, refine it, turn it into gear, machines, etc, then I HIGHLY recommend you focus exclusively on emeralds, diamonds, and topaz respectively as they are available in MUCH higher quantities and you can use a gem-changer chisel (which are very cheap) to change diamonds into rubies, emeralds into amethyst and topaz into sapphire once compacted.
For the lucent ores, they are only available on the temporary exo planets (for now - @james I think we’d all love to have some more permanent or regular options for lucent). To mine any significant amount efficiently, it’s important you get to the exo planet and arrive at a hotspot very quickly as, usually, within an hour or two, most of the spots are mined out and you’ll be left picking up scraps and scouring the perimeter of others’ mining expeditions. To be clear, you can still come away with a good haul should you show up late but you’re up against a problems:
- Trolls (there aren’t many in Boundless thankfully but occasionally you’ll run into one) regen bombing areas they are done with. Despite exos not regenerating naturally, you can regen bomb standard blocks.
- Best elevations and spots largely mined out leaving you to go to suboptimal elevations or the outskirts of the hotspots.
Again, you can still come away with a solid haul on lucents should you arrive late but please keep in mind the above!
Preparing to Mine
Click to Expand
At minimum, to mine like a pro, you’re going to need an AoE hammer capable of one-shotting rocks on the planet you’re heading to, a handful of super or mega speed brews and a handful of persisting pies. Super speed brews and persisting pies are dirt cheap. The brews go for 200 - 450c each and the pies are even cheaper at the time of this writing. The AoE one-shot hammers go for anywhere between 6-12K each depending on how well they were forged and where you shop. Or, you could check out @Vansten’s guide I mentioned in the introduction and forge some yourself!
To one-shot T6 rock, you will need an AoE diamond hammer that has a Forge Effect of +20 damage. Anything less will require a strength brew instead of speed brew in order to one-shot and I HIGHLY recommend against simply using a speed brew anyway and two-shotting rocks as you’ll go through the hammer twice as fast for half the yield. There is one potential, viable exception to the +20 rule but I’ll cover that in the tips and tricks section later. For T7 planets, the preferred hammer is a T6 one-shot hammer (+20 damage from Forge Effect) that is forged with max action speed (+50). You then use a strength brew to bump your damage up to one-shotting T7 rock.
Once you have your atlas, a single piece of the ore you’re heading out for slotted into it, a handful of speed brews, a handful of persisting pies and your trusty hammers, head on out to the prescribed planet, use the atlas and head to a good-looking spot. For example, on Galan, there are many such great spots for topaz as shown in my atlas screenshot above.
Basic Mining Technique
Click to Expand
When you’ve arrived at a decent spot, position yourself at the appropriate elevation and just inside the brightest blob of the hotspot. Then pick a cardinal direction that makes sense. I usually position myself at a “corner” of the main blob of the hotspot at which I’m going to mine and then pick a cardinal direction that would take me along the edge of that blob. This way, when I get to the other end of the blob, I can turn around and head back the other way thus heading further into the blob row by row. This brings me to my next topic which is strip mining.
The basic concept of strip mining is to mine straight in a direction, mine over perpendicularly once you reach the end of that specific path, and then mine straight back in the opposite direction, repeating this process over and over until you’ve exhausted either your hammer or the blob at which you’re mining. The idea behind strip mining is that, so long as you are inside a hotspot, you cover the most area as efficiently as possible thus ensuring maximum potential yields. If, by contrast, you head into a blob and just spin in a circle and hold down your mouse button, you may be opening up a large area within the hotspot but you are doing so very inefficiently and your yield will be substantially less overall in the long run.
Alternative Mining Techniques
Click to Expand
There are two other mining technique I’d like to mention that are suitable for different use cases. With the above strip mining, you are doing the most effective mining technique. That is to say you will achieve the greatest yields using it. That said, it can be monotonous and time consuming so if time is actually of greatest importance to you (i.e. getting decent but lower yields as fast as possible even if it’s inefficient compared to strip mining) then these techniques may suit you.
The first is what I call vertical mining. Go to the dead center of the hottest part of any given hot spot and head to the highest elevation (or even slightly higher) of the recommended ranges from above. Mine straight down until you hit the lowest desirable elevation and then grapple back up to the top, move over 5 spaces in a direction that still keeps you within the hot spot and repeat. Do this for any intense hot spots. You’ll get yields very fast but your yields will assuredly be less than proper strip mining.
The second technique is also faster than strip mining but more RNG prone. However, it can be pretty fun with an action speed hammer so there’s that! I call this method “spray and pray” mining. The concept is similar to vertical mining except instead of furiously mining straight down in the middle of an intense hot spot, you stand in place and spin 360 degrees slowly while holding down your hammer key. Essentially, you’re opening up a huge “disc” of minable area. If you can have something in your offhand with +attraction range, this method can be far more ideal than vertical mining while still falling a bit short of strip mining. After you’ve “cleared” an elevation, if you don’t have +attraction range, quickly run around the area you’ve blown open then head back to the center where you were, mine down exactly 5 blocks, and repeat until you’ve hit bottom recommended elevation.
Taking It to the Next Level
Everything above is what I’d consider the basics of efficiently mining in Boundless. However, there are several things you can do to increase your yields.
Dealing with Lava and Other Impediments
Click to Expand
When mining, you’ll often come across certain impediments like lava, gravel and sand. However, dealing with this is trivial.
Lava starts at 16 elevation so if you’re mining above that elevation, you won’t have to worry about lava breaking through the wall or ceiling and pouring onto your head. However, if you’re mining, say, diamonds, and you’re down around 10 elevation, you need to be aware. To handle lava quickly and easily, simply break a 3x3 into the ground under the lava and move on. The lava won’t spill over the one voxel “bucket” you’ve created. Additionally, you may want to change your cardinal direction when you encounter it. I generally like to first see if I can just get around the lava. It could be a small patch and if I go over up and back over a few voxels, I can often pass it by. If not, however, try heading in a 90 degree angle from your current path, specifically the 90 degree angle away from the lava so long as you’re still in the blob and start strip mining in that direction instead.
As for sand and gravel, simply move past it. You will encounter situations when gravel or sand is the entirety of the wall in front of you. That’s okay. Just break it with your hammer and keep pushing along. We’re already going to be picking up a ton of efficiency via the tips and tricks section anyway. For one-off sand and gravel, jump over it or move around it. Also, feel free to move over a single voxel or two to quickly go around sand or gravel in your path if it’s just a piece or two but make sure to quickly get back to your current row.
Tips and Tricks
Click to Expand
- I highly recommend dual-wielding hammers with your good hammer in your main hand and a plain old titanium hammer in the other. If you can’t live without auto loot, then find some titanium hammers that have it. Or, make your own. It’s a really cheap and simple forge.
- In addition to 1, use the titanium hammer to “clean things up”. When you use your AoE hammer to clear out an area, you will often have many resources hanging about in the area you cleared. My rule of thumb is that, if it’s 3+ resource blocks that I can hit with a single good hammer swing, I’ll use the good hammer. If it’s < 3, I use the titanium hammer. This will save you a ton of durability and titanium hammers with speed brew are very fast and, quite honestly, make a satisfying “tink” sound each time they hit ;).
- I highly recommend taking the Light Source epic so you don’t have to carry a torch around (which would have to fit in one of your hands. However, if you absolutely don’t want to do this, you can also get light forged on titanium hammers.
- When moving over a row perpendicularly while strip mining, or when going up or down elevation, always ensure no more than two voxels separate your new path from the one you just finished. For example, if you’re done with a single row and you need to move over to go back the other way, always go over exactly 5 voxels and then back down your new row by hitting the second to last column of voxels. This will leave exactly 2 voxels between your old row and your new one which means you will not be missing out on any resources. Even if you leave only 3, you run the risk of leaving resources in that middle voxel you can’t see.
- For topaz, I start at 140 elevation and strip mine back and forth until I’ve exhausted my current blob. When I reach the end at that elevation, I go down exactly 5 voxels and strip mine again back in the exact same rows but opposite direction. I generally do not stray beyond 130 - 140 meaning I generally do not do more than 3 full strip mines (140, 135, and 130) on any particular blob for topaz.
- For diamonds, I start at 17 elevation and do the exact same thing I do for topaz.
- For emeralds, again, I start at 17 and do the same thing I do for topaz and diamonds.
- Never, never, never, under any circumstance, swing your good hammer without a persisting pie up. Persisting Pies are dirt cheap and you’re doing yourself a huge disservice if you don’t have one up.
- Invest in some decent grapples. Personally I use Emerald for the long range. They last a very long time (I’ve had the same pair of Emerald long range for 3-4 weeks now and I mine a lot (thanks @Stunner for hooking me up!).
- If you get to an area and you find that, despite it being a fairly bright hotspot, it’s been mined, make a judgement call. Sometimes, in these situations, I’ll adjust my approach if I really like the particular area. For example, on Galan, if I go to a spot and it’s been mined, I might go ahead up to 150 and then down to 145 and 140 if those are available. The yields are still good. Other times, I’ll just move on.
- There is no need anymore to beacon and plot off an entire swath of gems. If you have a beacon like this, consider removing it. It’s really annoying for other miners to run into and, quite frankly, it serves no purpose anymore considering atlases update in near real-time and we have plenty of planets and resource density now. By contrast, if you’re simply setting up a few plots with some crafting tables, maybe some refineries, etc for a mining base, that’s totally cool and very efficient! Which brings me to my next tip:
- If you’re going to be serious about mining, consider finding a spot you like on any given planet and dropping a beacon there. Set out a few dozen crafting tables, maybe a handful of refineries, some storage blocks and even a chrysominter. All of these (minus the Chrysominter) are dirt cheap to buy or dead simple to craft and you can save yourself travel time to find good spots and also have a place to dump rock for XP or to simply mint for coin. If you’re going out with multiple hammers, it’s also really convenient as your inventory will fill up completely with resources after a hammer or two and you can drop them off before continuing on your way.
- If you arrive at a mining spot and someone is already there, please be a good Oortian and relocate. There’s plenty of resources to go around, even on exos, and mining next to someone (unless they’ve invited you to do so) is rude and, quite frankly, toxic. I’d be lying if I said I hadn’t brought regeneration bombs with me on occasion so that, if I’m already mining somewhere and someone starts mining on my face, I regen the area and leave. For exos, especially T7, you will almost always have lots of folks mining somewhat nearby but please don’t mine directly in front of someone’s face. Talk to them. Ask them which direction they’re heading and maybe head the other direction. Simple communication goes a long way!
- Piggy-backing on 12, if you don’t want to set up a full mining base, you might consider just taking a single chrysominter and a campfire with you even though it takes up two inventory spots. You can drop the campfire somewhere at the start of your mining and head back to it to mint rocks. You can easily come away with a grand or two in coin each hammer if you do this.
- For T7 lucent mining, as per the exception I mentioned above in a previous section, the best and most efficient way to do it so to find a T6 one-shot AoE hammer that, instead of durability, is forged with action speed. Then, instead of a speed brew, use a mega strength brew so you can one-shot the T7 rock yet still mine very quickly. Note, however, that action speed hammers are fairly expensive as far as AoE hammers go.
- Lastly, if you’re not going to mint or craft the rocks you gather, you might consider pre-allocating inventory spaces with the resources you are interested in. For example, if you’re mining diamonds but would also like a good amount of titanium, consider, once you have a little bit of each, split your diamonds and titanium up across multiple inventory spaces. This way, the sorting is done for you by virtue of the game mechanics and you don’t have to worry about dumping rocks and other resources constantly to make room for the stuff you want. I can’t tell you how many gems I let slip by back in the day because I didn’t pay enough attention and my diamond stacks were completely full and the rest my inventory was full with rocks.
 Thank you for doing this!!
