
In this guide I intend to showcase what boons are, the exact process behind getting the boons you want and how to efficiently increase those boons to higher level’s once there on your tool.
Table of Contents
-
Introduction- Understanding the basics
- Centraforge Character Build
-
An Explanation on Forging Materials
- The Gum and the Catalyst
- The Compound and the Resin
- The Paste and the Solvent
-
Understanding RNG with Boons, Quirks and Defects
- Boons
- Quirks and Defects
-
The Step by Step Process to Forging (and reducing RNG)
- Foreword
- Regen & Healing Bombs
- Latticework & Unchisel Chisels
- Auto Door Spanners
- Chisel Changers
- Buff Bombs
- Loot Sticks
- AoE Totem Solidifiers
- AoE Liquid Breakers
- AoE Bombs
- Grapples
- Slingbows
- Repair Spanners
- AoE Hammers, Shovels and Axes
-
Helpful Links
-
Closing Thoughts
Introduction- Understanding the basics
Click to Expand
Welcome to the Forge Guide! This resource is intended to act as an Encyclopedia to everything forging. While it may seem daunting (and infuriating) at first, this guide will show the most cost-efficient methods to forging while also lowering RNG as much as possible.
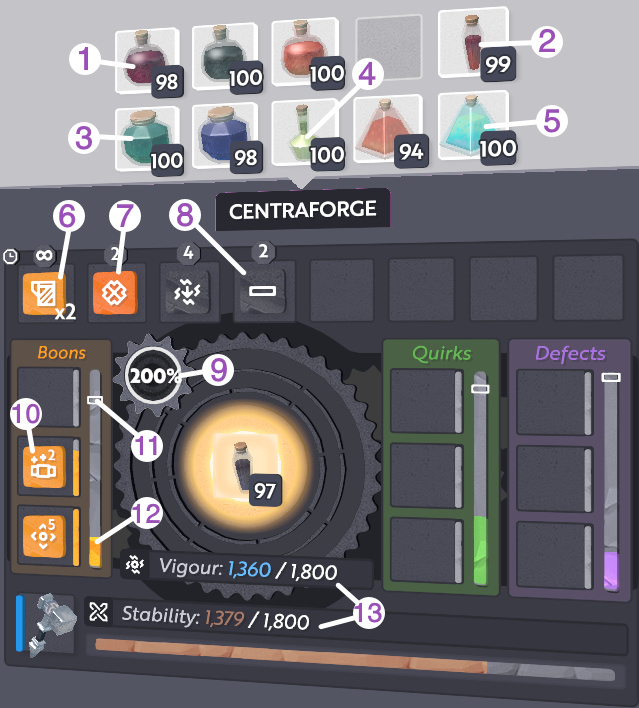
Forging in essence is dictated by Vigour and Stability (13). Using any ingredient in the forge can reduce either one or both, and act as the limiter for how “powerful” you can forge tools. These two stats are determined by your Power and Vitality, respectively.
The general aim of forging is, with the use of these ingredients, to acquire boons (10). Boons are positive effects that can be placed on tools (think enchantments from Minecraft), increasing things such as damage, durability, action speed ect…
One small note before we begin – if this is your first time forging and you are a PC player, it is recommended you practice on the test server – you can give yourself everything for free using debug, so it’s great for testing. To do this, simply right click on boundless on steam, select properties, click the Beta tab, and opt into the beta. Do note however that the test server isn’t always available.
Alternatively, you can also practice on this website, which acts as a rather realistic simulation of the forging experience to better prepare you - PS4 players can also take part of this!
And with that, lets begin!
Centraforge Character Build
It is recommended that in order to get the most out of your centraforge experiences, that you maximize your Vitality, Power, Intelligence and All Attributes bonus. In addition, it is also recommended you take the forging epic skill. This will require a total of 34 skillpoints, or 17 levels, to achieve.
An Explanation on Forging Materials
Click to Expand
Once your forge is set up, you can then put your tool into the forge and begun the forging process, with the ability to put in ingredients into your tool on a round-by-round basis.
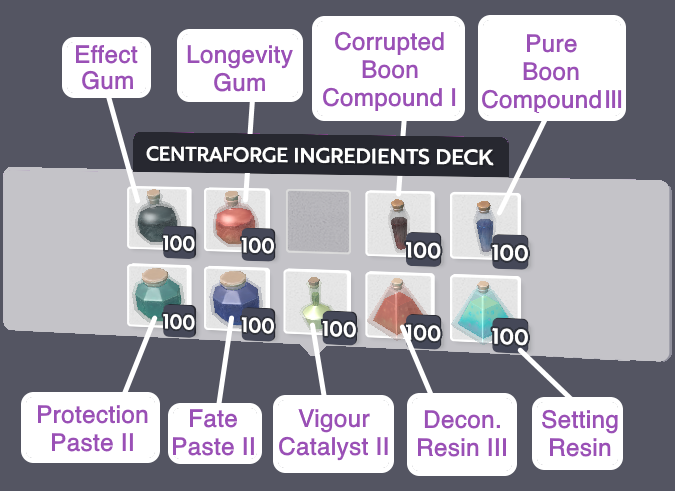
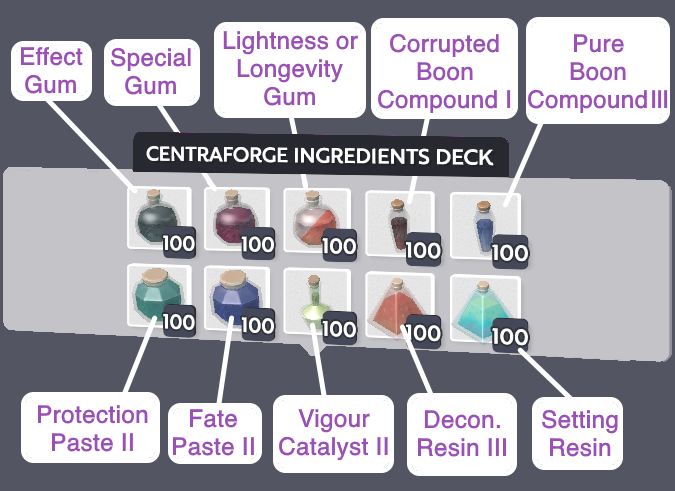
In game, there are 6 types of “ingredients” able to be used in the forge as seen in the “Introduction- Understanding the basics” section, which all have various effects which will be explained below.
The Gum (1) and the Catalyst (4)
Click to Expand
In game, there are 6 types of “ingredients” able to be used in the forge. We will talk about the first two – Gums and Catalysts.

1.) Gums - Essentially, Gums allow you to influence the outcome of what boons you get. When used, it gives the player a buff icon in the forge (6)
Gums are separated into categories, such as Special, Effect, and Longevity, increasing the outcome of getting any boon relating to their field. Stacking more of the same gum further increases the odds of getting any boon relating to their field.
Referring to the forge trait list document, if I were forging a slingbow and I put 3 Longevity gums into the forge, I would have a very high likelihood of getting Either the “Heavy Duty” boon, or the “Long Range” boon

2.) Catalysts – While a large number of catalysts exist, generally speaking, the only one that gets used is Vigour Catalyst II (4), which simply allow you to remove previously placed buff icons.
This is useful, for example, by allowing you to forge one boon onto your tool, such as Heavy Duty boon, than remove the Longevity Gum to place on an Effect Gum to try and forge another boon, such as Devastating Damage boon. As such, Vigour Catalyst II is Vital when forging more than 1 specific boon on a tool.
In addition, when used with Draining Boon Compound I (more on that later), you receive a rather nice portion of spent vigour back, allowing you to forge better equipment for longer.
The Compound (2) and the Resin (5)
Click to Expand
Both of these serve critical roles in the forging process – without them, it would be impossible to forge anything.

3.) Compounds allow you to obtain what is known as Boon Points (12). Whenever a compound is used, the boon bar is filled, and the game rolls a Counter (11); if this counter lands in the golden section of the boon bar, the game gives you a random boon. The boon it gives you can be influenced by Gums.
The amount by which the boon bar is filled by is determined by the compound, and is multiplied by the boon point effectiveness multiplier (9). This effectiveness multiplayer is determined by the tier of tool being forged – lower tier items, such as iron or copper, have a higher multiplayer than tools made out of gems. In addition, Centraforge coils can also improve this multiplier.
There are a lot of different compounds available for use – the ones I use will be covered below:
-
Draining Boon Compound I – Fills up the boon bar while also providing the Vigour Drain debuff, which drains 20 vigour per round. However, once we stack enough of these at once, we can use Vigour Catalyst II to restore a good portion of spent vigour, allowing for better forges
- In addition, it also fills up the quirk bar. Quirks are tool effects that provide a benefit, but also a drawback, some being more preferred than others.
-
Corruption Boon Compound I - Fills up the boon bar while also providing the Corruption debuff (8), which adds 80 defect points per round. However, once we stack enough of these at once, we can use Vigour Catalyst to restore a good portion of spent Vigour, allowing for better forges
- Defects are the opposite of boons - they weaken tools in certain areas. However, the rate at which defect points generate are low, and therefore we can avoid defects when using other ingredients (more on that later)
-
Pure Boon Compound III – Fills up the boon bar. Costs more vigour but has no other negative side effects.
Using all either 2 of the 3 together is key to creating forges that maximize boon points while having little to no quirks or defects

4.) Resins
There currently exists two types of Resins – both of which are very important.
Deconstruction resin allows you to basically reset your forge if you’re not happy with how it’s going. Level 1 – 3 gives back 25% - 75% of your ingredients back. I recommend using only level 3 – as the cost of ingredients to craft it is much less than the cost of ingredients to craft all other components needed in forging.
Setting Resin is basically the “I’m finished” button. Once it’s used, the tool than goes into the Centraforge’s que before being ready to use.
The Paste (3) and the Solvent
Click to Expand

5.) Pastes have a large variety of uses. Similarly to gums, they provide useful player buffs (7), however these are round-limited buffs, meaning they often only last 3-5 rounds, and rather than influencing which boon is picked, provide different benefits.
These benefits can include reducing vigour or stability costs, increasing boon point gain, or reducing quirk and defect point gain.
The two that I like to use are Fate Paste II and Protection Paste II.
-
Fate Paste II re-rolls the boon slider if it doesn’t land within the boon points, while also re-rolling the quirk or defect sliders if they DO land in their respective point’s, effectively guaranteeing more boons while lowering the chance for quirks or defects
-
Protection Paste II costs ~105 stability + 100 vigour, and reduces stability usage by half for 4 rounds, effectively providing a net bonus of ~110 stability. Essentially, it acts as a way to gain more stability in exchange for vigour, making it quite useful.

6.) Solvents are essentially your “undo” button. They simply allow you to remove boons, quirks, or defects. Two notable solvents include:
-
Boon Removal Solvent – Simply removes a boon, and rerolls a new boon. This “new boon” can be identical to the one that was just removed however.
-
Boon Transmute Solvent – Removes a boon, and rerolls a new boon. However, this “new boon” will never be the same as the one that was just removed. This is also much more expensive to craft, requiring roadrunner feathers.
As a personal preference, I don’t like to use Solvents simply because I feel it’s better to reset the forge if it you get an unwanted boon as opposed to spending a bunch of vigour fixing it. As such, this guide will not be using them whatsoever
Understanding RNG with Boons, Quirks and Defects
Click to Expand
For this, I will be referring to this spreadsheet, which documents every available boon, quirk and defect, as well as what tools they are restricted to.
Boons
Essentially, as previously mentioned, Boons are your “positive” effects. Each tool can have up to 3 boons, and can benefit the tool in all areas. Boons are separated into categories – when using Gums, you have a significantly higher chance of getting any boon from that category.
However, because some categories have more possible boons available than others, we can reduce RNG by forging the boons in order of how unlikely they are to be applied. For example, there are 3 possible Effect boons we can put on a slingbow – more damage, more crit damage, and heavy projectiles. If we apply effect gums first in an effort to get more damage, we can reset it using Deconstruction Resin for cheaper compared to if we attempted to do the same thing later on in the forge. Following this, we can apply both longevity boons (more durability and range), which is almost guaranteed.
In this way, the order of forging the boons is critical to reducing RNG, and as a result, cost. This guide will therefore showcase the correct order to forging specific types of gear by showing the lowest possible RNG method.
Quirks and Defects
Quirks generally provide a positive but “at a cost”. For example, Best of Health increases action speed while at high health, but lowers it while at low health. One Jump Ahead makes you jump randomly, but gives you a double jump available for use (even without the epic skill). Unlike boons, quicks are entirely RNG.
Some people try to avoid them completely, while others generally prefer having them. It is up to you to decide if you want quicks or not, but keep in mind that even with the best of efforts, sometimes you may get one.
Defects on the other hand, are complete opposites to boons, providing downgrades to tools. While this may sound bad, sometimes they are more preferred than Quirks. For example, when forging hammers, certain quirks such as lower critical chance or critical effect can be preferred over quirks. This, again, depends on forging preference.
The Step by Step Process to Forging (and reducing RNG)
Foreword
The following information will list the exact process behind forging various pieces of equipment, ranked in difficulty of 1-4, from easiest (lowest RNG and/or cost) to hardest (highest RNG and/or cost).
Each tutorial will showcase the minimum amount of forging materials needed to forge each equipment – as such, some decks may look quite small. This guide Is made in mind assuming you will be forging 5 items at once – while less at once is ok, you may run out of materials if you decide to forge more than 5 at a time.
Most forges generally start by putting two gums of the type of boon you want i.e Effect Gum, using 1-2 of the same Compounds, and resetting if you don’t get the desired boon first time. This is cheaper than using Transmute Solvent, and saves on Vigor and Stability. Vigor and Stability act as the limiting factor in forging – once either one runs out, it is impossible to continue forging that tool .
When wanting multiple boons on a tool, we start with the boon that has the lowest chance of being chosen. For example, referring to the Forge Trait List shown earlier, using a Special Gum on a Slingbow has a roughly 1 in 4 of having Multishot Boon being chosen, whereas using a Longevity gum on a Slingbow has a roughly 1 in 2 chance of having Heavy-Duty (Durability) Boon being chosen.
Once the forging process is done, we put in a setting resin to complete the tool.
Regen & Healing Bombs
Difficulty: ![]()
Click To Expand

Regen bombs allow you to regenerate mined blocks instantly. While they do not regenerate ores or other resources, they are useful for harvesting blocks such as gleam.
Healing bombs, as their name implies, heal you once they go off. They can be used against players or dead creatures to go off instantly, and are more cost effective in the long run compared to healing brews.
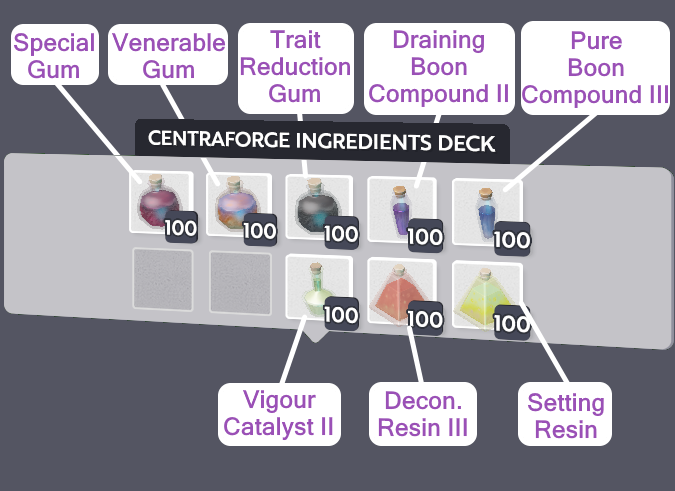
Referring to the Forge Trait List shown earlier, we can see that under the bomb column that the “Regenerator” and “Hot on Their Heals Boon I / II / III” are both considered “special boons”. As such, assuming all goes well you are essentially guaranteed one or the other.
Methodology
Round 1: - Special Gum
Round 2: - Special Gum
Round 3: - Trait Reduction Gum
Round 4: – Trait Reduction Gum
Round 5: - Draining Boon I
- Repeat round 5 until you reach max level of Regenerator or Hot on Their Heals
- If you accidentally get a second or undesired boon while doing so, use Deconstruction Resin III and try again
Latticework & Unchisel Chisels
Difficulty: ![]()
Click To Expand
Latticework Chisels are a type of chisel that allows you to chisel very thin or small shapes, which can be useful for making detailed chisel works such as pipes.
Unchisel Chisels, as their name implies, resets a block to an unchised state when used.
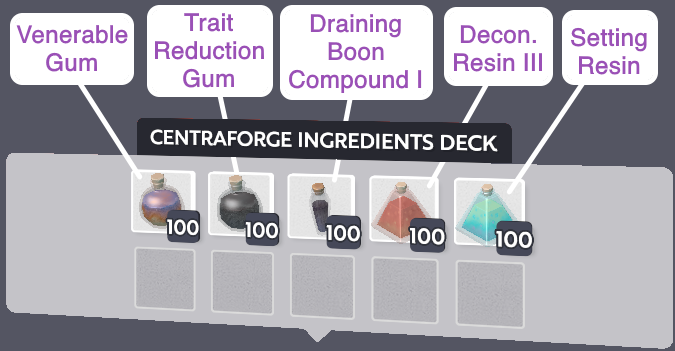
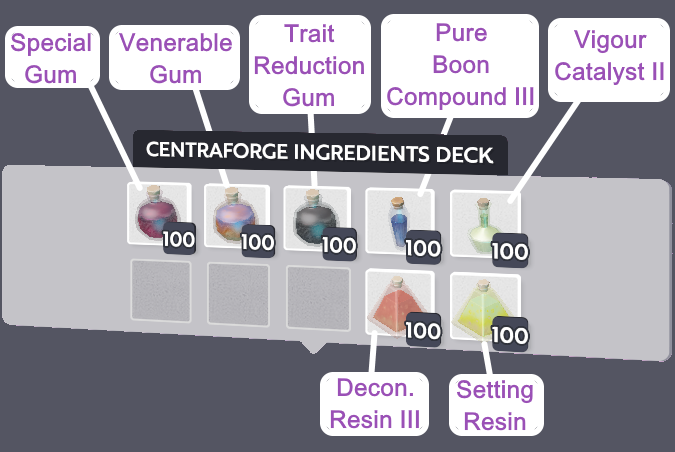
Similar to Regen & Healing Bombs, both are obtained the same way through Venerable Gums, therefore the following process essentially guarantees one or the other.
Methodology
Round 1: - Venerable Gum
Round 2: - Venerable Gum
Round 3: - Trait Reduction Gum
Round 4: – Trait Reduction Gum
Round 5: - Draining Boon I
- Repeat round 5 until you reach max level of Latticeworker or Unchisel boon.
- If you accidentally get a second or undesired boon while doing so, use Deconstruction Resin III and try again
Auto Door Spanners
Difficulty: ![]()
Click To Expand
Auto door spanners allow you to set doors to either open or close automatically. Of note is that auto door spanners set the durability of the spanner to 1/10 of the original durability.
They are also forged identically to Latticework and Unchisel chisels, except this time we are forging a spanner instead of a chisel.
Methodology
Round 1: - Venerable Gum
Round 2: - Venerable Gum
Round 3: - Trait Reduction Gum
Round 4: – Trait Reduction Gum
Round 5: - Draining Boon I
- Repeat round 5 until you reach max level of Auto Door Boon
- If you accidentally get a second or undesired boon while doing so, use Deconstruction Resin III and try again
Chisel Changers
Difficulty: ![]()
Click To Expand
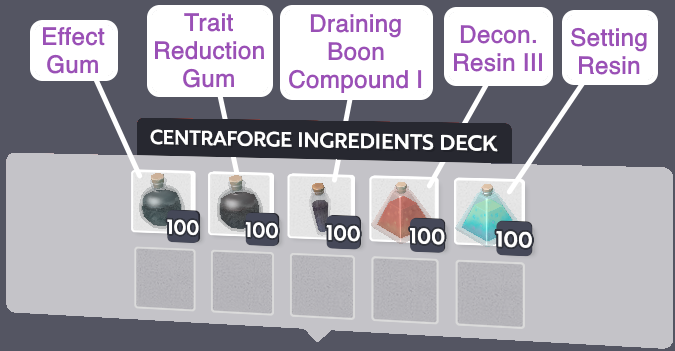
Chisel changers are simply chisels that have the Transformation boon, allowing them to change blocks to other similar types. The only difference here is if you use stone, metal, or gem chisels, given how some blocks will only change when hit with a higher-tier chisel changer.
Methodology
Round 1: - Effect Gum
Round 2: - Effect Gum
Round 3: - Trait Reduction Gum
Round 4: – Trait Reduction Gum
Round 5: - Draining Boon I
- Repeat round 5 until your chisel has the Transformation Boon
- If you accidentally get a second or undesired boon while doing so, use Deconstruction Resin III and try again
Buff Bombs
Difficulty: ![]()
Click To Expand
Buff bombs are bombs that, when thrown, provide a temporary buff to players. They come in 3 varieties - Damage, Speed and Amour, however the process for obtaining all 3 is the same.
Methodology
Round 1: - Venerable Gum
Round 2: - Venerable Gum
Round 3: - Trait Reduction Gum
Round 4: – Trait Reduction Gum
Round 5: - Draining Boon I
- Repeat round 5 until you reach max level of your desired boon.
- If you accidentally get a second or undesired boon while doing so, use Deconstruction Resin III and try again
Loot Sticks
Difficulty: ![]()
![]()
Click To Expand
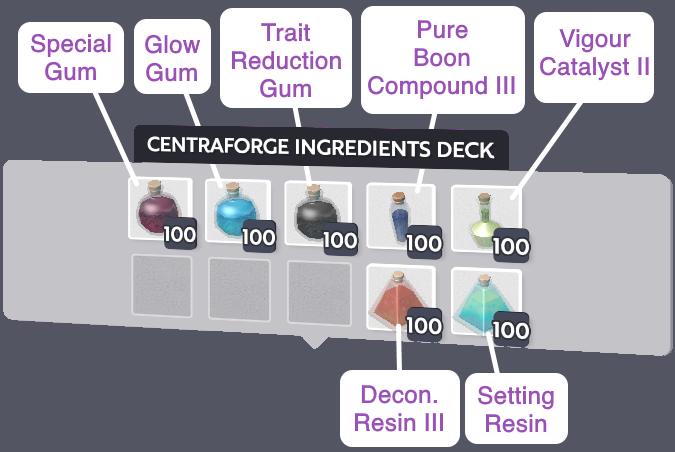
Loot sticks are, essentially, any item that has auto looter attached to it – which auto loots any dead creature corpse and gives you the contents. The best lootsticks also emit light, to make nighttime hunting easier. The 2 boons we will be trying to get are Magnetic Collector, and Glow, and we will be using a Chisel for better RNG
Methodology
Round 1: – Special Gum
Round 2: – Special Gum
Round 3: – Draining Boon I
- If you get no boons, repeat Round 3
- If you get a boon that isn’t Magnetic Collector, use Deconstruction Resin III and try again
Round 4: – Vigor Catalyst II
Round 5: – Glow Gum
Round 6: – Glow Gum
Round 7: – Pure Boon III
- If you get no additional boons, Repeat Round 7 until you do
- If you get a boon that isn’t Glow, use Deconstruction Resin III and try again
Round 8: – Vigor Catalyst II
Round 9: – Trait Reduction Gum
Round 10: – Trait Reduction Gum
Round 11: – Trait Reduction Gum
Round 12: - Pure Boon III
- Repeat round 12 until you reach max level of Glow and Magnetic Collector
- If you accidentally get a third or undesired boon while doing so, and the boons are not near max level, use Deconstruction Resin III and try again
AoE Totem Solidifiers
Difficulty: ![]()
![]()
Click To Expand
Solidifiers are totems that, when used, can solidify liquids into their solid form - water to ice, lava to rock ect…
They can be useful for obtaining Amber from Primordial Resin and Bitumen from Petrolim for decoration, as well as creating easy bridges across water or lava lakes.
For convenience we will also be forging AoE on the totem, to make bridge-making and liquid converting easier. You can skip to round 5 if you wish to not have AoE on your totem.
Methodology
Round 1: – Special Gum
Round 2: – Special Gum
Round 3: – Draining Boon II
- If you get no boons, repeat Round 3
- If you get a boon that isn’t Flanker’s Force / Low Blow / Cross Purposes / All-rounder / Random Acts (hereafter referred to as “AoE Boon”), use Deconstruction Resin III and try again
Round 4: – Vigor Catalyst II
Round 5: – Venerable Gum
Round 6: – Venerable Gum
Round 7: – Draining Boon II
- If you get no additional boons, Repeat Round 7 until you do
- If you get a boon that isn’t Solidifier, use Deconstruction Resin III and try again
Round 8: – Venerable Gum
Round 9: – Trait Reduction Gum
Round 10: – Trait Reduction Gum
Round 11: – Trait Reduction Gum
Round 12: - Pure Boon III
- Repeat round 12 until you reach max level of Solidifier boon and “AoE Boon” is level 4
- If “AoE Boon” is close to leveling to 5 and Solidifier still isn’t filled, put more Venerable Gums before continuing.
- If you accidentally get a third or undesired boon while doing so, and the boons are not near max level, use Deconstruction Resin III and try again
AoE Shovel Liquid Breakers
Difficulty: ![]()
![]()
Click To Expand
In contrast to Solidifiers, Liquid Breakers allow the collection of liquids so that they may then be placed within a beacon for decorative and farming purposes.
Similarily to Solidifiers, For convenience we will also be forging AoE on the tool, to make mass harvesting easier. You can skip to round 5 if you wish to not have AoE on your tool.
We can use any basic tool, but for this I will be forging a shovel - any tier should work, but copper, silver, topaz and amethyst have the fastest speed and highest durability for their tiers.
Methodology
Round 1: – Special Gum
Round 2: – Special Gum
Round 3: – Pure Boon III
- If you get no boons, repeat Round 3
- If you get a boon that isn’t Flanker’s Force / Low Blow / Cross Purposes / All-rounder / Random Acts (hereafter referred to as “AoE Boon”), use Deconstruction Resin III and try again
Round 4: – Vigor Catalyst II
Round 5: – Venerable Gum
Round 6: – Venerable Gum
Round 7: – Pure Boon III
- If you get no additional boons, Repeat Round 7 until you do
- If you get a boon that isn’t Liquid Breaker, use Deconstruction Resin III and try again
Round 8: – Trait Reduction Gum
Round 9: – Trait Reduction Gum
Round 10: – Trait Reduction Gum
Round 11: - Pure Boon III
- Repeat round 11 until you reach max level of Liquid Breaker boon and “AoE Boon” is level 4
- If “AoE Boon” is close to leveling to 5 and Solidifier still isn’t filled, put more Venerable Gums before continuing.
- If you accidentally get a third or undesired boon while doing so, and the boons are not near max level, use Deconstruction Resin III and try again
AoE Bombs
Difficulty: ![]()
![]()
![]()
Click To Expand
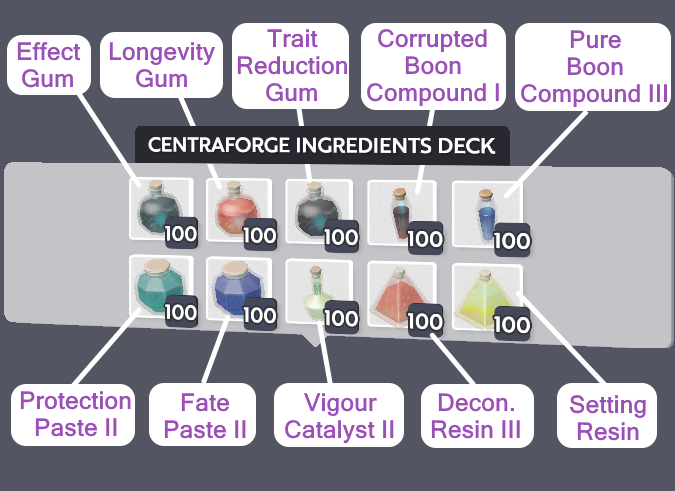
AoE Bombs, as their name suggests, are bombs that are forged with added AoE. In addition, they are also forged with added damage in effortlessly clear out large areas of ground.
Methodology
Round 1: - Effect Gum
Round 2: - Effect Gum
Round 3: – Corrupted Boon I
- If you get no boons, repeat Round 3
- If you get a boon that isn’t Devastating Damage, use Deconstruction Resin III and try again
Round 4: – Vigor Catalyst II
Round 5: - Longevity Gum
Round 6: - Longevity Gum
Round 7: - Corrupted Boon I
- If you get no boons, repeat Round 7
- If you get a boon that isn’t Bigger Boom, use Deconstruction Resin III and try again
Round 8: – Trait Reduction Gum
Round 9: – Trait Reduction Gum
Round 10: – Trait Reduction Gum
Round 11: - Protection Paste II
Round 12: - Protection Paste II
Round 13: - Protection Paste II
Round 14: - Fate Paste II
Round 15: - Fate Paste II
Round 16-24: – Corrupted Boon I
- Keep repeating round 16 until you run out of the protection buff (which should occur after 8 rounds)
Round 25: - Vigour Catalyst II
Round 26: – Trait Reduction Gum
Round 27: – Trait Reduction Gum
Round 28: – Trait Reduction Gum
Round 29: - Fate Paste II
Round 30: - Pure Boon Compound III
Repeat round 30 until Stability reaches <110
Grapples
Difficulty: ![]()
![]()
![]()
Click To Expand
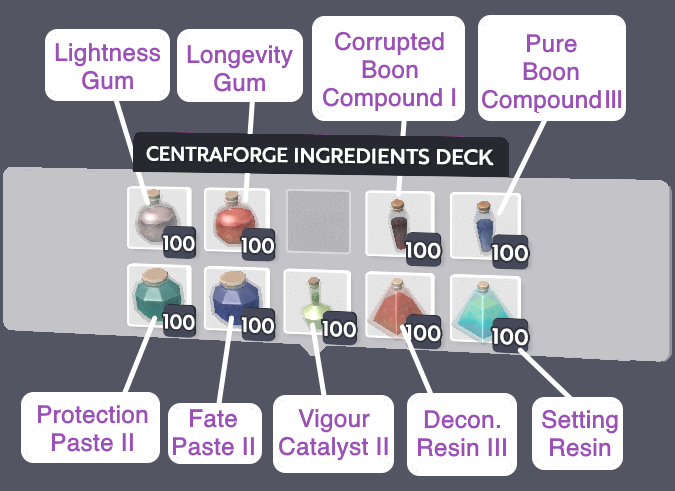
For this, I will be aiming to forge an emerald grapple with the fly fast boon (which increases the grapple’s projectile speed), as well as both longevity boons, increasing durability and grapple distance.
Methodology
Round 1: - Lightness Gum
Round 2: - Lightness Gum
Round 3: – Corrupted Boon I
-
If you get no boons, repeat Round 3
-
If you get a boon that isn’t Fly Fast, use Deconstruction Resin III and try again
Round 4: - Vigor Catalyst II
Round 5: - Longevity Gum
Round 6: - Longevity Gum
Round 7: - Longevity Gum
Round 8: - Longevity Gum
Round 9: - Protection Paste II
Round 10: - Protection Paste II
Round 11: - Protection Paste II
Round 12: - Fate Paste II
Round 13: - Fate Paste II
Round 14-22: – Corrupted Boon I
-
If you get a boon that isn’t Far Reaching or Heavy Duty, use Deconstruction Resin III and try again
-
Keep repeating round 14 until you run out of the protection buff (which should occur after 8 rounds)
Round 23: - Vigour Catalyst II
Round 24: - Protection Paste II
Round 25: - Protection Paste II
Round 26: - Protection Paste II
Round 27: - Fate Paste II
Round 28: - Fate Paste II
Round 29+: – Pure Boon III
- If at any time, stability would drop to below 0, use a setting resin
- If you have >60 stability and the Protection buff is still active, you can still proceed with to the next round without losing the tool
- If at any time your Vigour drops to 100, switch to corrupted boon compound I
Slingbows
Difficulty: ![]()
![]()
![]()
Click To Expand
There are quite a lot of customization options available when forging slingbows. The method below, which aims to put Devastating Damage and both longevity boons (durability and longer projectile flight time), is the one I prefer simply because of the minimal RNG and cost involved, compared to trying to forge a slingbow with multishot and damage boons.
Methodology
Round 1: - Effect Gum
Round 2: - Effect Gum
Round 3: – Corrupted Boon I
-
If you get no boons, repeat Round 3
-
If you get a boon that isn’t Devastating Damage, use Deconstruction Resin III and try again
Round 4: - Vigor Catalyst II
Round 5: - Longevity Gum
Round 6: - Longevity Gum
Round 7: - Longevity Gum
Round 8: - Longevity Gum
Round 9: - Protection Paste II
Round 10: - Protection Paste II
Round 11: - Protection Paste II
Round 12: - Fate Paste II
Round 13: - Fate Paste II
Round 14-22: – Corrupted Boon I
-
If you get a boon that isn’t Long Range or Heavy Duty, use Deconstruction Resin III and try again
-
Keep repeating round 14 until you run out of the protection buff (which should occur after 8 rounds)
Round 23: - Vigour Catalyst II
Round 24: - Effect Gum
Round 25: - Protection Paste II
Round 26: - Protection Paste II
Round 27: - Protection Paste II
Round 28: - Fate Paste II
Round 29: - Fate Paste II
Round 30+: – Pure Boon III
- If at any time, stability would drop to below 0, use a setting resin
- If you have >60 stability and the Protection buff is still active, you can still proceed with to the next round without losing the tool
- If at any time your Vigour drops to 100, switch to corrupted boon compound I
Repair Spanners
Difficulty: ![]()
![]()
![]()
Click To Expand
AoE Hammers, Shovels and Axes
Difficulty: ![]()
![]()
![]()
![]()
Click To Expand
The following method is designed to be used on Ruby Hammers (which are better for mining Tier 7 worlds). Assuming all goes well they can:
- One shot Tier 5 rock
- One shot Tier 6 rock when used with level 1 Strength Brew
- One shot Tier 7 rock when used with level 4 Strength Brew
Alternatively, using the same method on Diamond hammers (which are better for mining Tier 6 worlds) can:
- One shot Tier 5 & 6 rock
- One shot Tier 7 rock when used with a level 1 Strength Brew
We will be aiming for AoE 4, Damage 10, and either Heavy Duty (durability) or Busy Bee (faster speed) depending on preference.
Methodology
Round 1: - Effect Gum
Round 2: - Effect Gum
Round 3: – Corrupted Boon I
-
If you get no boons, repeat round 3
-
If you get a boon that isn’t Devastating Damage use Deconstruction Resin III and try again
Round 4: - Vigor Catalyst II
Round 5: - Special Gum
Round 6: - Special Gum
Round 7: - Corrupted Boon I
-
If you get no boons, repeat round 7
-
If you get a boon that isn’t Flanker’s Force / Low Blow / Cross Purposes / All-rounder / Random Acts (hereafter referred to as “AoE Boon”), use Deconstruction Resin III and try again
Round 8: - Vigor Catalyst II
Round 9: - Longevity or Lightness Gum
Round 10: - Longevity or Lightness Gum
Round 11: - Longevity or Lightness Gum
Round 12: - Corrupted Boon I
-
If you get no boons, repeat round 12
-
If you get a boon that isn’t Heavy-duty or Busy Bee, use Deconstruction Resin III and try again
Round 13: - Vigor Catalyst II
Round 14: - Effect Gum
Round 15: - Effect Gum
Round 16: - Protection Paste
Round 17: - Protection Paste
Round 18: - Protection Paste
Round 19: - Fate Paste
Round 20: - Fate Paste
Round 21-29: – Corrupted Boon Compound I
- Keep repeating round 21 until you run out of the protection buff (which should occur after 8 rounds)
Round 30: – Vigor Catalyst II
Round 31: – Special Gum
Round 32: – Protection Paste
Round 33: – Fate Paste
Round 34: – Pure Boon Compound III
- Repeat round 34 until “AoE Boon” is at level 4
Round 35: - Vigour Catalyst II
Round 36: - Longevity or Lightness Gum
Round 37: - Longevity or Lightness Gum
Round 38: - Pure Boon Compound III
- Repeat round 38 until Stability reaches <110
Helpful Links
- Shows a list of every possible Boon, Quirk, and Defect.
- Make a copy of the Forge Materials Spreadsheet - it can help you determine the rough cost of each forge by inputting what ingredients you used
- Shows how many hits are required to destroy blocks or kill creatures
- Acts as a rather realistic forging simulator, with the added bonus of also allowing PS4 player to practice.
- A methodology written by wakenbake, which explains the process behind forging Lucent gem tools
Closing Thoughts
Hopefully this guide has helped you understand the forging process. I tried to be as detailed as possible in the procedures, while also breaking up the guide into readable sections.
If you have any thoughts, recommendations or criticism, feel free to comment below!
